
Before you begin to use Target Analytics ResearchPoint, take a moment to review the following notes, which highlight new features and changes to existing features. It is important to share this information with all Target Analytics ResearchPoint users in your organization. For more information about any of the new features listed, see the ResearchPoint How-to Documentation page.
To help researchers manage prospects, we added Research Lists, which allow you to efficiently build lists based on simple criteria. You can also leverage a powerful tool set included with the lists. The tools allow you to screen, analyze, and prioritize your prospects.
Research Lists replace Research Groups, but the replacement comes with a number of enhancements that make the lists more workable. It is no longer simply a group screening and Raiser's Edge integration tool.
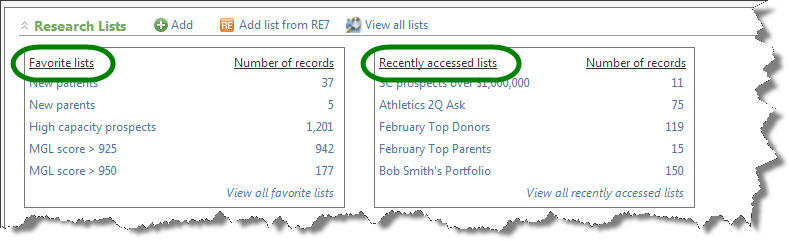
Understanding that researchers want to see useful research list information from the Prospects functional area, we added favorite and recently accessed lists to the top of the Prospects page. From here, a researcher can open any list included in the Favorite lists or Recently accessed lists box, add a new list, view all lists, and/or add a new list from The Raiser's Edge 7 (if integrated with ResearchPoint).
The main research lists page can be accessed by clicking View all lists from the Prospects page. This takes you to an unfiltered list of all your saved lists. Here you can manage your lists, delete old ones, and perform top level actions on individual lists.
Filters: Selecting Filters provides you with three filtering options: Favorites, Accessed Lists, and lists you created.
Favorites: To mark a list as a favorite, just click the star next to the name. The list will then display in your favorites list on the Prospects page.
Actions available: On each list, if you select the drop down to the left of the name, you can access a number of actions.
Edit the list
Delete the list
Assign a prospect manager to all member of the list
Generate a map locating all members of the list
Generate a Research list report
Columns: Because the Research lists page includes the List builder functionality, you can reorder and add columns. You can also quickly search for your list or filter the lists based on a specific column.
Categories: Categories were added to enable further segmentation of your lists. You assign your list to a category from the Add/Edit research list screen. You create categories in Administration.
When you open a research list, the new list page displays wealth summary information in the new summary section at the top of the page: no more Wealth Summary tab. From here, you can track your remaining screens, view your subscription level, and even request more screens.
Also, the Members tab is now a Members list with all related tasks living in the list. From here you can edit the list, map members locations, delete members, copy members to other lists, disable WealthPoint updates on member records, add new members to the list, and more.
If you integrate with The Raiser's Edge, you'll notice this tab is also gone and replaced with a column in the Members list. From here, you can see if the member is linked to The Raiser's Edge, and if so, you can open the Raiser's Edge record from the list. You no longer have to navigate to the record in ResearchPoint.
As a researcher, you need to see the members of the group and sort by various wealth, giving, affiliation, and biographical attributes so that you can effectively focus on the top prospects. To aid you in this effort, we added the List Builder functionality to Research Lists.
With List Builder, you can filter, reorder and search content included in a list. One of the best improvements with lists is that you can now display only columns you feel important for managing your list. Research lists include a large set of Biographical, Wealth, Giving, and Ratings fields you can set as columns and filters. You can also include attributes as columns.
To make attributes available in your lists, from Administration click Attribute Categories. Open the Attribute category you want available on your lists and click Edit. The Edit attribute category screen appears. Select Make available in lists and click Save.
Each user that has rights to view a list can set the columns they want to view and those columns remain the next time they return to the list. When a new list is built, it returns with a default set of columns.
For more information about List builder see the List Builder video.
With the new Add/Edit research list screen, you can easily control who is included in your list, and you can do this without creating or editing a selection file in Query. You now have direct access to the most common fields used to build lists. The fields are arranged based on five categories: Biographical, Education, Giving, Ratings, and Wealth. If your criteria needs are more complex, you can still use selections or use a combination of both to create the list.
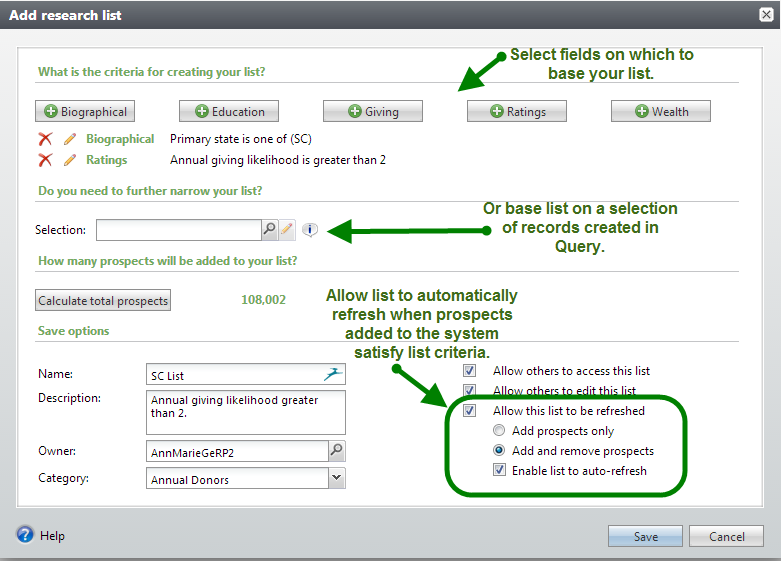
Categories: You can now set categories when you build your list. This enables easier list management .
Populate process is gone: You no longer have to run a populate process step when you want to refresh your list. Now, you can set a refresh option when you add the list. If the refresh option is included when the list is created, you can simply click a button on the Research lists page to refresh your lists. You can also choose to have the lists update automatically nightly.
Editing lists: You can easily change the criteria used to build your list by selecting the Edit option under the list. When you then rebuild the list with your changes, ResearchPoint asks if you want to just add new people to the existing list or rebuild the list entirely.
You can now select and act on multiple records at a time:
For a specific prospect member in the list, you can:
For members linked to The Raiser’s Edge, you can sync the records, view the Raiser's Edge record, and unlink the record
Prospect researchers and fundraisers working in a group record can now easily access summary wealth information on a group member without having to leave the group record.
From the Members list on the Research List page, click the link in either the Total confirmed assets or Total identified assets column. The member's Wealth summary screen displays.
Click any assets or indicator link on this screen to access that specific information on the member's wealth and ratings page. For example, if you want to view this member's real estate information, you can click the Real estate link in the Assets column. You can always navigate back to the list by clicking on the List name under the Research Details on the Wealth Summary tab.
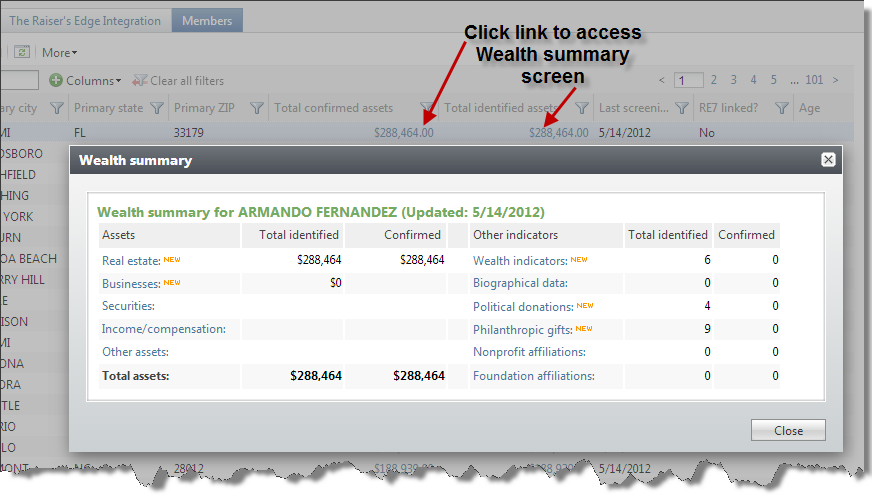
The "New" icon identifies assets and indicators that have been updated since the last time this record was viewed.
To allow researchers to easily identify research list membership and navigate to the lists, we include information about and links to any research lists that include the prospect. The list membership information is located in the Research details section of the Wealth Summary tab on the Wealth and Ratings page.
The order in which the lists display is based on:
Up to 10 groups can display on the prospect's Wealth and Ratings page.
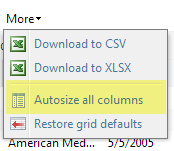
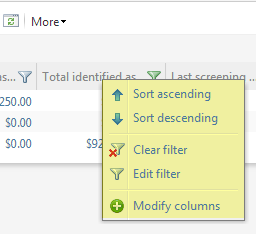
Autosize all columns: From the top of any grid, select the More button and click Autosize all columns. All columns included on the page are uniformly sized. This is especially helpful if you have added multiple columns and want to remove any extra white space to display more columns in your screen view.
Sort, clear filter, edit filter, and Modify columns: All options have been added to the right-click menu of each column.
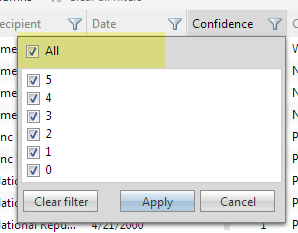
Select all/deselect all: Options added for Confidence rating filter. This is also very helpful when you’re inside of each section of the prospect record and want to quickly adjust what results you see.
To allow fundraiser to better research prospects linked to records in The Raiser's Edge, the following rights have been added to the Development Officer roles in ResearchPoint:
Development Officer (View Only) role can:
Development Officer (Advanced Rights) role can: