Review Export Options
Once you have GL Accounts on all your funds and your transactions are ready to export, you are ready to run the QuickBooks Desktop Standard Export.
Here are some things to keep in mind before you get started:
- Set up one export for gifts and pledge payments, and if you want to track pledges in QuickBooks, create a different export for pledges.
- Separate Cash and Check donations from those made by Credit Card.
- Make sure you don’t include transactions that have already been exported.
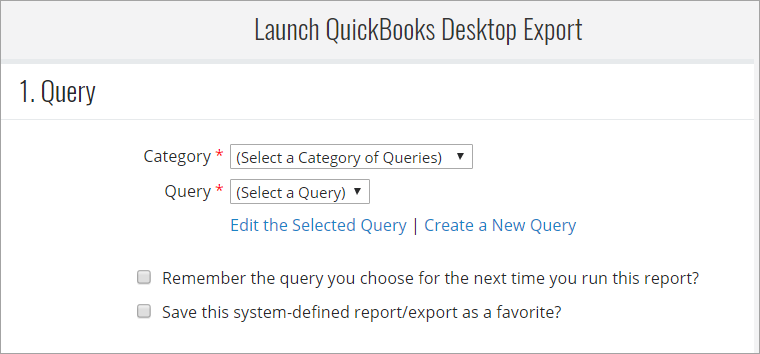
Query Selection
From the Launch QuickBooks Desktop Export page, select a query. You can use one of the standard queries like one of the Constituent Journal Entry Date queries, or you can create your own Journal Entry query.
Customer Information
Setting the Export Name format allows you to keep Donor Names consistent in QuickBooks. The import will create a new donor record for any donor that does not already have a record in QuickBooks, using the format specified here.
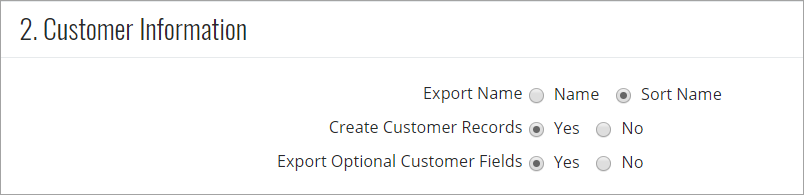
Clicking Yes on Create Customer Records will add a Customer Import section to the export file. This will ensure that new donors are added to the Customer List, and not the Vendor or Other Names lists. If a donor listed in the export file already appears on the Vendor or Other Names list, this option will generate an error during the import for that donor.
If you select No and do not want to track donors in QuickBooks as customers, you should not use the "Cash Sale" option. Selecting "Cash Sale" will always create customer records in QuickBooks.
Clicking Yes on Export Optional Customer Fields will include contact information about the Customer in the export file.
Transaction Information
QuickBooks Transaction Type determines whether donations are stored in your QuickBooks database as cash sales or deposits.
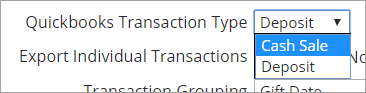
You can use the "Cash Sale" option when you import your donations to the QuickBooks Undeposited Funds account, which is a kind of holding tank for transactions that have not yet been assigned to the correct Cash account. This allows you to use the QuickBooks Make Deposit feature to group donations into deposit transactions without requiring that the correct deposit date be tracked in eTapestry.
You can also use "Cash Sale" when you import pledges to QuickBooks. For more information, see Import Pledges to QuickBooks as Invoices.
Note: If you use Sales Receipts and select the Cash Sale option, you must set up the Cash account for each of your Funds to point to the QuickBooks® Undeposited Funds account, either by name or by account number.
You can choose the "Deposit" option if you want the export to group more than one donation into the same transaction. For example, if you want to enter all of the checks that came in today in one bank deposit, you could choose to group by Gift Date.
Here are a few pointers:
- If you want to see the donation on customer reports (called Donor Reports in the non-profit version of QuickBooks), you need to select "Cash Sale". If you do this, you should also set the Create Customer Records option to Yes.
- If you are not tracking donors in QuickBooks as customers, you should not use the "Cash Sale" option. If you do, you will get an error message when you try to import the record.
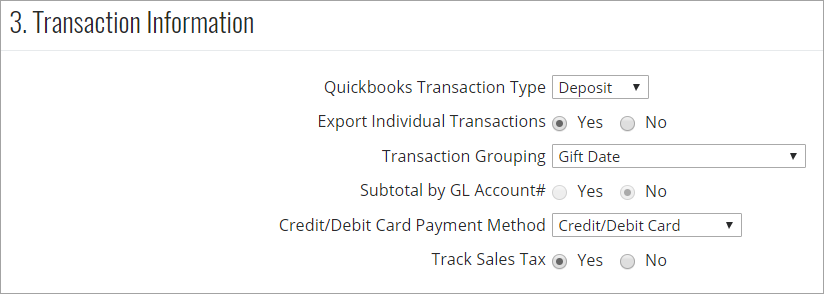
By selecting No on Export Individual Transactions, you indicate that you want to group multiple donations into a transaction when it makes sense.
Within Transaction Grouping, you can request that transactions be grouped by gift date, credit card type, or using one of two special user defined fields, Deposit ID and Deposit Date.
- When transactions are grouped by credit card type, they are also grouped by gift date; that is, a Visa payment made on 12/10/2017 will only be grouped with other Visa payments made on the same date. The export will create a separate transaction for Visa payments made on 12/11/2017, or for Discover Card payments made on 12/10/2017. Cash, Check and other non‐ credit‐card transactions will be grouped together as having credit card type blank.
- When you select the Deposit Date option, all transactions that have the same value in the Deposit Date field are grouped together. If an eTapestry transaction does not have a value filled in for Deposit Date, or if the Deposit Date user defined field does not exist, the export will use the Gift Date instead.
-
When you select the Deposit ID option, the system expects that all of the transactions that have the same Deposit ID will also have the same Deposit Date. If an eTapestry transaction does not have a value filled in for Deposit Date, or if the Deposit Date user defined field does not exist, the export will use the Gift Date instead.
Within a transaction, eTapestry also provides the option to Subtotal by GL Account #. This option will create a single distribution line for each combination of credit account and class that are represented within a transaction. This option is only available when Transaction Grouping has been selected.
Select a credit/debit card method:
- Credit/Debit Card - The words "Credit/Cebit card" appear as the Payment Method on the QuickBooks transaction for a gift or payment that has the gift type set to "Credit/Debit Card" in eTapestry.
- Credit/Debit Card Type - The credit/debit card type that you selected on the gift page appears in the QuickBooks Payment Method field.
Select whether to track sales tax. If you track sales tax in QuickBooks, select Yes. Otherwise, select No.
Customizable Fields
The values in the drop-down menus for the customizable fields vary depending on the grouping options selected. These fields populate text portions of the QuickBooks records.
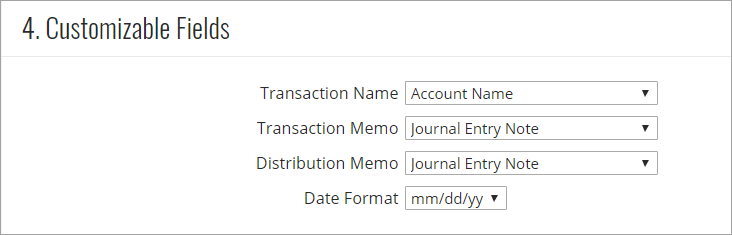
The value selected in the Transaction Memo and Distribution Memo fields has no impact on the success of the import process, regardless of the Transaction Type selected. However, when you select a Transaction Type of “Cash Sale”, the import will fail if the transaction name does not contain a valid name from the QuickBooks Customer List.