Query 101
eTapestry Best Practices: Learn how to break down query requirements and build them.
Have you had to create a query at some point? If you haven’t, you are likely to very soon. Queries are an extremely important part of eTapestry, but tricky for beginners. Since queries are used when you run reports, create documents, send emails, and perform global updates, you’ll eventually need to create a query to take advantage of these features.
Everyone has their own idea on what a query is or how it should work. Whether you just looked up the definition or have used other database software, your mind is going to go to your own interpretation of the word “query”. For example, you may think, “A query is a tool to find a specific set of accounts or journal entries that meet a set of criteria.” The key part of this is that it is a tool to find the who. That’s it. Do you need to view address information for constituents who attended an event? A query does this. Do you need to find all constituents who made donations in 2014 for the General fund? A query does this.
Keep in mind that a query is extremely literal; it can only find what you tell it to based on your criteria. So, if you wanted to see donors and non-donors from 2014, you cannot create a query to find those specific accounts. The request is actually looking for two completely different groups of constituents: constituents that gave donations and constituents that did not. You can create a query to find donors in 2014, but then it will not include non-donors. You can use a couple of queries to find non-donors, but then it does not include donors. Since these are two different groups, you need to create two different queries to find each group separately. You may struggle determining when to create one query and when to create multiple queries. As you learn how queries work, you’ll learn to break down your requests into separate groups and then further break down those groups to find out what criteria you should use in a query.
Think of queries just like a logic puzzle. Like any puzzle, a query is easier when you break it down and focus on one part at a time. Let’s say someone asks you to find all donations that came in from 2014. The statement itself contains the criteria we need use. We know we need donations, and we know we need them from 2014. Right away, we can identify the two pieces of criteria we need. We may not know the exact criteria to use in the database, but we have our query requirements. This is how we can visualize the breakdown of the request:
Find all |donations| from |2014|.
Not everyone visualizes the same way, but this is a good method to use to determine the best way to build your query.
Even though we live in the age of technology, you can never beat a good pad of paper and a pencil. This is commonly used in Blackbaud Support to jot down notes when working with a customer and makes it easier to begin breaking down the information needed from query. If you are a visual person, drawing lines to break up the sentence into multiple parts helps isolate the needed criteria. So, if you are not sure, give it a try. Write it down! As you get better, you are likely to just write key parts that you hear rather than the whole sentence.
Many of the donation queries you build will be similar to the above example, so let’s dive into actually creating this one.
Again: Find all |donations| from |2014|.
In eTapestry, complete the following steps.
1.From Queries, click the Base category (or any category you prefer to store the query in).
2.Under Tasks, click New Query.
3.Enter the name “2014 Donations.”
After you name the query, jump to the Starting Query fields. By default, the Category is set to Base and the Query is set to All Constituents – A. The Starting Query is actually another query. No query stands on its own because you build a new query off of another query. For this example, leave the starting criteria set to the defaults. Many new eTapestry users change the Starting Query to All Accounts – A, but this is usually too broad. Remember that there are different types of accounts in the database (users, constituents, and tributes), but only Constituents give donations. Constituents are donors or potential donors. So, if you use All Accounts to pull donations, your results could duplicate certain transactions. For example, if a donation is made in tribute of someone, it is included once from the constituent and a second time from the tribute account. This skews your totals, so leave Query set to All Constituents since that includes your donors.
After you select the Starting Query, look at the Data Return Type field. By default, this field is set to Accounts. Accounts will pull in just the account into our results. When we add our criteria to include donations within the date range, query returns the accounts that made those donations rather than the journal entries that are the donations. If you only want to see who made the donations, Accounts is fine. However, let’s assume we need to see how much was donated and when. In this case, change the Data Return Type to Journal Entries to include actual donations.
There are other fields such as Relationship Info, Criteria Matching, Which persona should be checked for matches?, and Query Type. Those fields may play roles in future queries, but for our example we are going to leave these set to the defaults because they are intended to use for advanced queries.

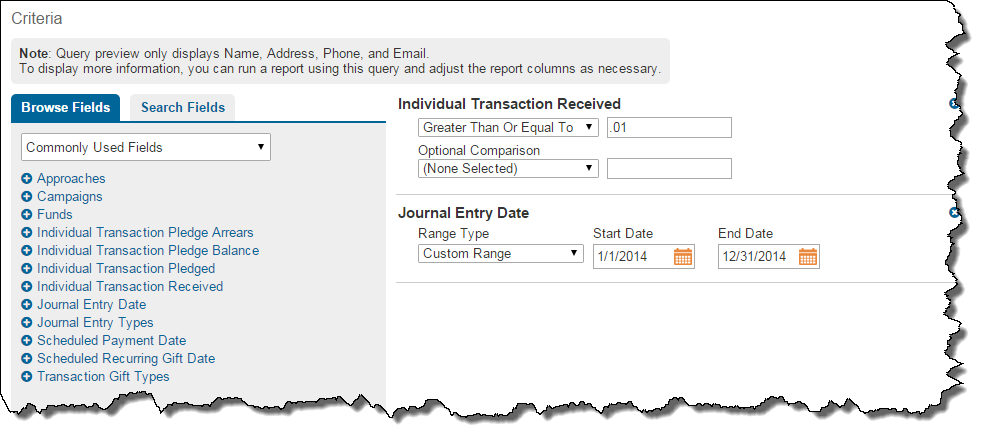
Now, we can move on to adding criteria to the query. You use criteria to tell the query exactly what to include in results. Under the Criteria section, the selection in the drop down field determines the available fields for the query. The field defaults to Commonly Used Fields each time you create a new query or open one. The fields available for this selection are great because they are the criteria fields that users commonly select. You can find these fields in other locations by changing the drop down menu, but it is faster to leave Commonly Used Fields selected and include them from here.
Criteria fields are the blue links below the drop down menu. For this example, click Individual Transaction Received from the list of links. When you click the link, the criterion appears . In the fields that appear, select Greater Than Or Equal To and then enter “.01”. This tells the query to look at all journal entries on our constituent accounts (per the Starting Query defaults), and only include those entries that have a received amount of $0.01 or more. Typically people don’t donate lower than a $1.00, but by entering .01, we can find anything equal to or higher than a penny. Next, leave Optional Comparison to the default of None Selected. This Individual Transaction Received criteria now ensures that we are only looking at donations. Remember, part of the request was to include |donations|.
The second set of criteria you need is a 2014 date range. For this, click Journal Entry Date. In the Start Date field, enter 1/1/2014 and in the End Date field, enter 12/31/2014. When you do this, the program looks at the Date field on each journal entry and returns the ones that meet your date range.
You have now built your query, so let’s test it. Under Tasks, select Preview in the drop down field under the Save And button.
Note: The Save And button appears on many pages in eTapestry. Read this like a sentence: “You want to save and”…perform another function. In this case, you want to save your query and then preview the results.
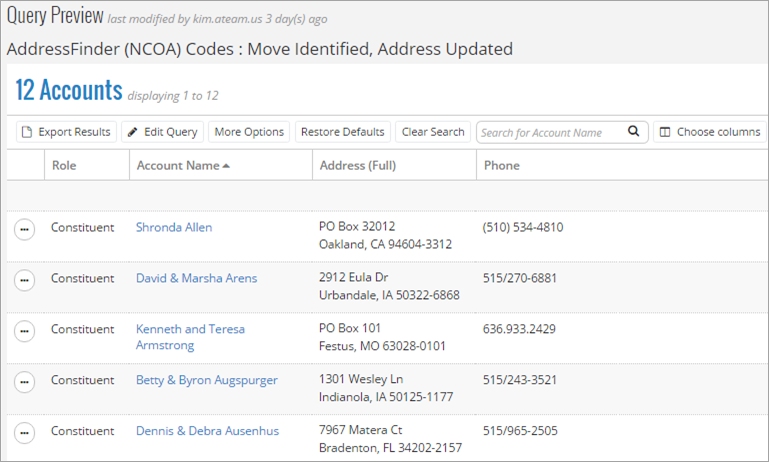
To select which columns appear in the preview grid, select Choose columns. Select the columns you want to see in your query preview, or clear the columns you do not want to include. You can narrow down the columns to choose from by filtering by column category or searching for a column by name in the search field.
Once you have selected your columns, click Apply Changes. If you want to change the order of your columns after you have made your selections, click the name of the column to drag and drop. You can click Restore Defaults to return default column settings.
You can export your results in a format that you can use outside eTapestry, such as a PDF. From the toolbar on the Query Preview page, select Export Results. Under Format, select how you want to receive your query preview results. For example, if you want a PDF sent to a specific email address, select PDF Document - Email in the drop down menu. Provide an email address and a subject line for the email, if you select to have your results emailed to you.
Note: If you have a large amount of query preview results, select Archive in Zip File so that the file is compressed for faster transmission.
From the More Options drop down menu, you can select to run a report with your query preivew results, send communication using your results, or transfer your results to Constant Contact.
Remember, query functionality is not intended to replace custom reports. While query preview allows you to add commonly used columns to the preview grid, you can report on any information you track in eTapestry with custom reports. Also, you will still use custom reports to sort, hide, aggregate, and subtotal columns.
Hopefully this topic helps working with queries a bit easier. The key piece is to always break down what you want to find into smaller sections. This helps you determine how many queries you need and the criteria to use.