Exercise: Create a .NET UI Model Assembly Project
Step 1 - Setup.
-
Make sure you installed Microsoft Visual Studio 2008 on your development machine/computer.
-
Make sure you have a development instance of Blackbaud CRM or another Infinity-based Blackbaud application such as ResearchPoint.
-
Make sure you installed the Blackbaud Infinity SDK.
-
Make sure you loaded the TableSpec that creates the USR_FOODITEM table. For details, see Data Model Definition Overview.
Step 2 - Create and load spec.
The basis of any UI Model is the spec that generates it. It is logical to conclude the first step is to ensure you have a spec that is in good working order.
Note: If you are a Blackbaud Professional Services technical consultant, third-party developer, or customer working on a custom data form, data list or search list, then you may create a UI Model based on your custom data form, data list, or search list. However, only Blackbaud Product Development staff can create a UI Model based on an "out-of-the-box" spec because only they have access to these specs.
In the example that follows, we will create a UI Model from the FoodItem.Add.xml simple custom Add Data Form that adds rows to the custom USR_FOODITEM table. The spec accepts a series of values from the user interface and passes them to a stored procedure that saves the data. The spec uses form fields to accept values for the name, description, current cost, default low threshold, and weight of food items.
<AddDataFormTemplateSpec
    xmlns:c="bb_appfx_commontypes"
    ID="ee2cb812-cc6b-41c3-8165-59585f04a2ba"
    Name="Food Item Add Form"
    Description="Used for Adding a new Food Item"
    Author="Technical Training"
    RecordType="Food Item"
    Data FormInstanceID="b911e219-42f2-4b64-9f02-d9e2ff899799"
    c:SecurityUIFolder="Constituent\Food Bank\Food Item"
    xmlns="bb_appfx_addData Formtemplate"
    >
    <SPData Form>
        <SaveImplementation SPName="USR_USP_DATA FORMTEMPLATE_ADD_FOOD_ITEM">
            <c:CreateProcedureSQL>
<![CDATA[
create procedure dbo.USR_USP_DATA FORMTEMPLATE_ADD_FOOD_ITEM
(
    @ID uniqueidentifier = null output,
    @CHANGEAGENTID uniqueidentifier = null,
    @NAME nvarchar(100),
    @DESCRIPTION nvarchar(max) = '',
    @CURRENTCOST money = 0.00,
    @LOWINVENTORYTHRESHOLD smallint = 0,
	@WEIGHT Decimal(10,2) = 0.00
) as

set nocount on;
if @ID is null
    set @ID = newid()

if @CHANGEAGENTID is null
    exec dbo.USP_CHANGEAGENT_GETORCREATECHANGEAGENT @CHANGEAGENTID output

declare @CURRENTDATE datetime
set @CURRENTDATE = getdate()

begin try
	-- handle inserting the data
	insert into dbo.USR_FOODITEM
		(ID, NAME, DESCRIPTION, CURRENTCOST, LOWINVENTORYTHRESHOLD, WEIGHT,
		ADDEDBYID, CHANGEDBYID, DATEADDED, DATECHANGED)
    	values
		(@ID, @NAME, @DESCRIPTION, @CURRENTCOST, @LOWINVENTORYTHRESHOLD, @WEIGHT,
		@CHANGEAGENTID, @CHANGEAGENTID, @CURRENTDATE, @CURRENTDATE)
end try

begin catch
    exec dbo.USP_RAISE_ERROR
    return 1
end catch

return 0

]]>
</c:CreateProcedureSQL>

            <c:ExpectedDBExceptions>
                <c:Constraints>
                    <c:Constraint Name="UC_USR_FOODITEM_NAME" Field="NAME" Type="Unique" />
                    <c:Constraint Name="CK_USR_FOODITEM_NAME" Field="NAME" Type="Required" />
                </c:Constraints>
            </c:ExpectedDBExceptions>

        </SaveImplementation>
    </SPData Form>

<!-- describe the context ID for this form (if applicable),
which corresponds to a parameter in the SP. -->
	<!--<Context ContextRecordType="REPLACE_WITH_RECORDTYPE" RecordIDParameter="CONTEXTID"/>-->

	<c:FormMetaData FixedDialog="true">
        <c:FormFields>
            	<c:FormField FieldID="NAME" Required="true" MaxLength="100" Caption="Name" />
            	<c:FormField FieldID="DESCRIPTION" Caption="Description" />
            	<c:FormField FieldID="CURRENTCOST" DataType="Money" Caption="Current Cost" />
<c:FormField FieldID="LOWINVENTORYTHRESHOLD" DataType="SmallInt" Caption="Low Inventory Threshold" />
<c:FormField FieldID="WEIGHT" DataType="Decimal" Caption="Weight" DefaultValueText="0.00" Description="The weight of a food item." />
        </c:FormFields>

    <!-- Switching over to the default WebUI instad of the Win Form UI-->
    <c:WebUIComponent>
      <c:WebUI>
        <c:DefaultWebUI/>
      </c:WebUI>
    </c:WebUIComponent>

  </c:FormMetaData>
</AddData FormTemplateSpec>
Toward the bottom of the spec, you may notice the following XML elements:
    <!-- Switching over to the default WebUI instad of the Win Form UI-->
    <c:WebUIComponent>
      <c:WebUI>
        <c:DefaultWebUI/>
      </c:WebUI>
    </c:WebUIComponent>
Note that we are using a default web UI instead of the WinForm UI. This essentially means the platform generates a default web layout and UI Model for us "on the fly." Therefore, you can conclude that you can switch any Data Form over to use a web-based user interface by simply replacing the <c:FormUIComponent> elements with the <c:WebUIComponent> tags you see above. Since I loaded and tested the Data Form to ensure the stored procedure logic performs as expected, let's move on to create a UI Model assembly project, add a UI Model .NET class, and add a customized web UI to the Add Data Form.
Warning: Make sure you save and load the spec before you create a UI Model. The UI Model wizard generates the model based on the spec that is saved in the database.
Step 3 - Create a new UI Model project.
Here is a link to the Food Bank Source Code.
Right-click the solution file and select Add\New Project…
Create a new Blackbaud AppFx .NET Assembly Project using the UI Model Project template within Visual Studio. Name the test project "Blackbaud.CustomFx.FoodBank.UIModel."
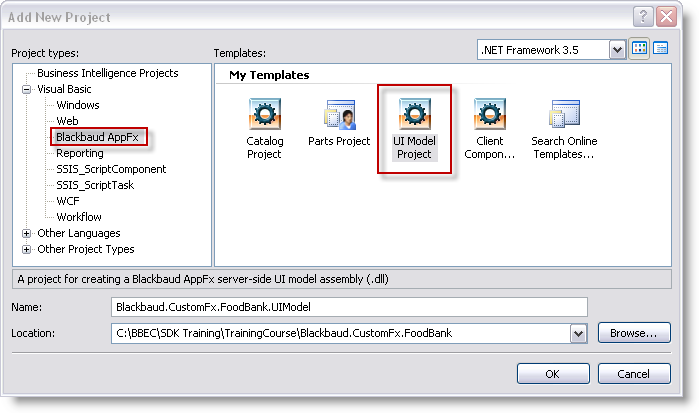
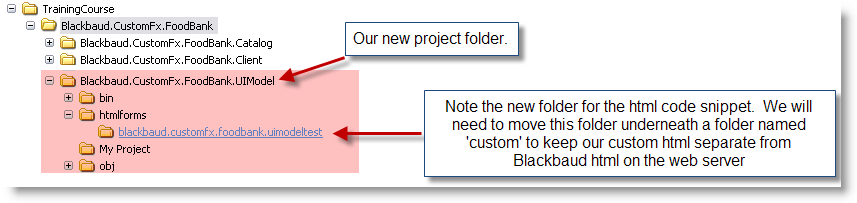
The new project folder we create should be housed underneath the solution and reside at the same level as our catalog project and client project.
Note: Take note of the naming convention for the new UI Model assembly project: Blackbaud.CustomFx.FoodBank.UIModel. Blackbaud recommends a consistent naming convention for your UI Model projects.
Step 4 - Configure the project's Compile properties.
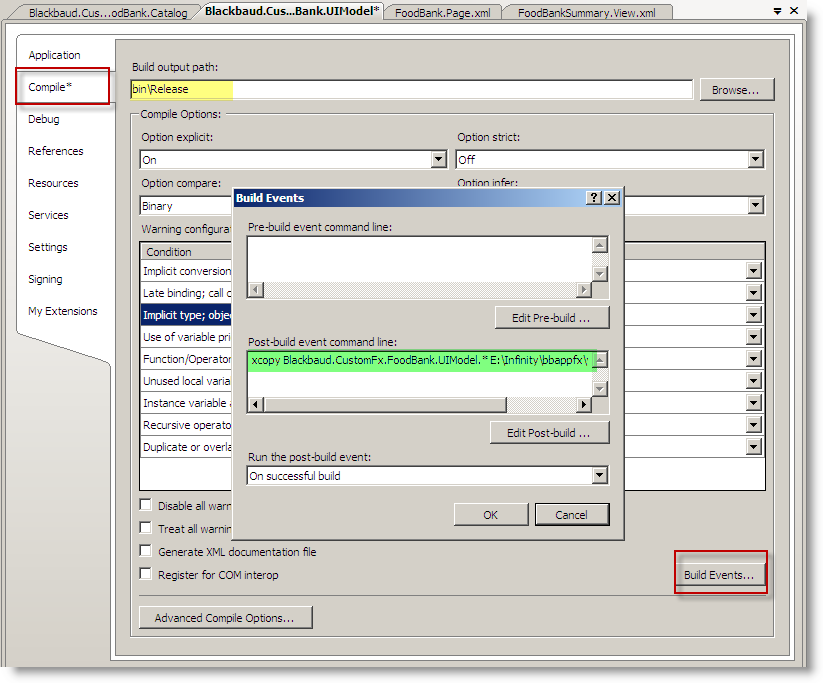
Right-click the new project and select Properties from the popup menu. Select the Compile section on the left side of the property window.
Ensure the build output path is set to bin\Release.
Click the Build Events… button. Depending on the directory location where your Infinity web server is installed, ensure the xcopy command is copying the UIModel assembly (.dll) to your vroot\bin\custom folder. Your xcopy command should look similar to this (please note, the path to your vroot\bin\custom folder may differ):
xcopy Blackbaud.CustomFx.FoodBank.UIModel.* E:\InfinityDEV\bbappfx\vroot\bin\custom /y
Note: Place double quote marks around the directory paths if the directory names contain spaces. Otherwise, you will receive an error that your xcopy command has too many arguments .
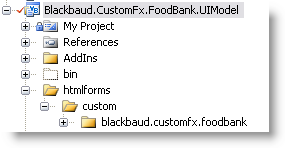
Step 5 - Create a custom folder for our HTML forms.
Create a folder named "custom" and place the existing blackbaud.customfx.foodbank folder underneath the custom folder. This keeps your HTML organized and separated from the out-of-the-box Blackbaud HTML on the web server. Your folders should look similar to this:
The assembly project will live on the server and contain our UI Model implementations (code). It also contains our client side UI components (HTML, JS, CSS, etc). The compiled assembly (.dll) will live within the vroot\bin\custom folder, and the HTML will live within the vroot\browser\htmlforms\custom\ blackbaud.customfx.foodbank folder.