Step by Step: Create a Custom UI Model
Overview
Note: Download the source code for this sample at CustomUIModelSample.
Let's build a Custom UI Model that does not retrieve its data from a database; instead, it retrieves data from a web service. This Custom UI Model will display a weather forecast for a given ZIP code.

Figure: Weather forecast Custom UI Model form
When a user enters a ZIP code and clicks the Get Forecast button, the UI Model code retrieves a forecast from NOAA's National Weather Service. The UI Model code communicates with the web service via a proxy class that is generated from the following Web Service Description Language (WSDL) document. After it retrieves the weather forecast from the web service, we place the results in a forecast grid which is collection of form fields. Let's go to the code!
Prerequisites
This content assumes you know how to create a UI Model for a data form. It also assumes you know the basics behind creating a catalog project, UI Model project, functional area, task, and page.
This example uses Visual Studio 2010.
Create a Visual Studio 2010 Solution
Step 1 - Create a Visual Studio solution.
Build the CustomUIModelMetadata Spec
The simplest way to describe a Custom UI Model is that its data form spec without a load or save implementation. The Custom UI Model is displayed just like a view form and retains all the features of a UI model view form, including HTML layout, interactivity using UI fields and actions, and the ability to write custom JavaScript for the model.
This sample is built using a Visual Studio 2010 solution along with a UI model project and a catalog project. The UI model project will hold our Custom UI Model spec, UI model code, a web reference to the NOAA weather web service, and helper WeatherMan and WeatherResult classes that wrap and simplify calls to the web service. The catalog project will hold a functional area spec, page spec, package spec, and task specs.
Step 2 - Add a project to a new solution by selecting the UI Model Project template. We will name the project Blackbaud.CustomFx.MyTest.UIModel. We will refer to this project as the "UIModel" project.

Figure: Add a UI Model Project
Step 3 - Next, add a Custom UI Model Metadata spec to the UI Model project. Name the spec "WeatherTest1CustomUIModelMetadata.xml."
This is one of the rare cases where we do not add a spec to the catalog project. This is due to the fact that we won't load the spec into the catalog system via Load Spec or any other mechanism. It is merely used as a means to generate the UI model code that represents our Custom UI Model form. After you generate, a UI Model from the XML, you are free to keep the XML file around as a reference.

Figure: Select the Custom UI Model catalog item template
In the Custom UI Model spec, we see the item template was kind enough to provide us with some identifying metadata at the top of the spec along with some sample form fields. We will alter the description, author, and form header attributes of the root CustomUIModelMetadata element.
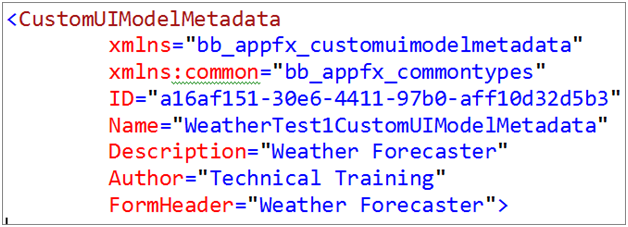
Figure: CustomUIModelMetadata spec
Step 4 - Replace the form fields with form fields that allow a user to enter a ZIP code and display the results of the weather forecast. We use a collection of fields to represent the three columns in the collection grid.
The collection grid is named WEATHERFORECAST, and the three columns in the collection grid are named DATE, HIGHTEMP, and LOWTEMP. Finally, a UIAction element provides a button on the form. When a user clicks the button, code within the UI Model utilizes the WeatherMan class to retrieve the forecast from the NOAA web service and display each day in the forecast as a row within the collection grid. Below is the entire spec.
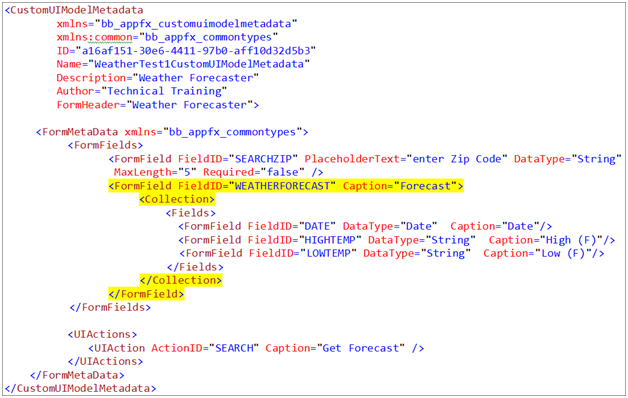
Figure: Add the form fields for ZIP code and a collection of form fields that represent the weather forecast
Step 5 - Modify your folder structure that holds the HTML and JavaScript files for the UI Model project, if desired.
Since I am simulating a third-party project, I renamed the default folder to "Blackbaud.CustomFx.MyTest.UIModel" and placed this folder under a folder named "custom."
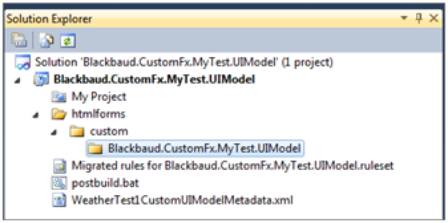
Figure: Organize the CustomUIModel
Step 6 - Click Save All to save the project and solution.
Create the UI Model for the CustomUIModelMetadata Spec
An important distinction with a Custom UI Model spec is that unlike a traditional data form, we never load the Custom UI Model spec into the catalog. The UI Model Wizard uses the spec to generate the UI Model code. It is this UI Model code that is the actual definition for the Custom UI Model form. In fact, theoretically, you could code the Custom UI Model without the help of a spec or the UI model wizard.
Step 7 - To launch the UI Model Wizard, right-click our UI Model project and selecting Add\New item from the popup menu. On the Add New Item screen, select the UI Model Wizard item template and click Add.
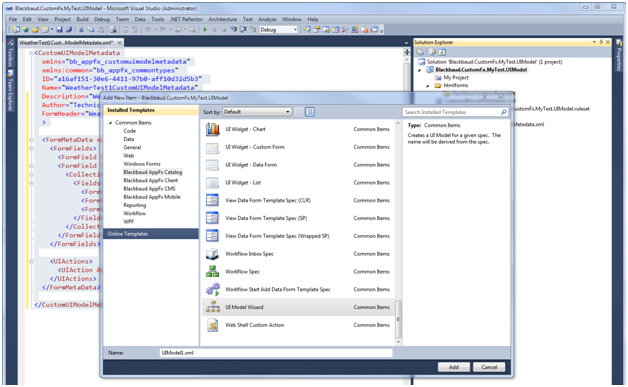
Figure: Start the UI Model Wizard
The wizard dialog window appear. Enter the following values for the wizard:
| Wizard Option | Instructions |
|---|---|
|
Spec File |
Browse to the path of your Custom UI Model spec within the UI Model project. |
|
Name |
Accept the default name for the UI Model class |
|
Generate Html file for the model |
Keep this option selected and enter the path for your HTML files. Example: <Your UI Model project location> \htmlforms\custom\Blackbaud.CustomFx.MyTest.UIModel. |
|
Generate model from the database |
Do not select. The Custom UI Model spec is never loaded into the catalog. Therefore, we can’t generate the model from the database. |
Using the value in the table above, the wizard dialog looks like this:
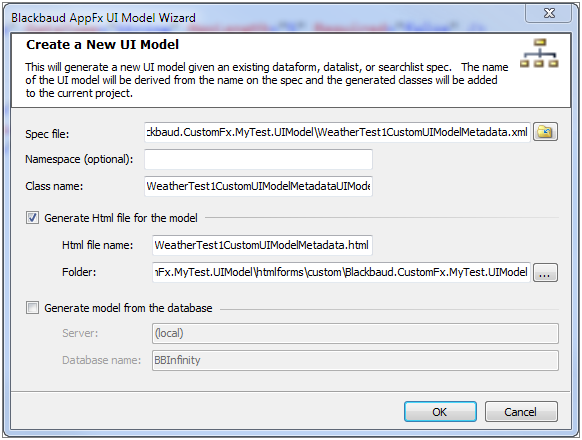
Figure: Do not generate the UI model from the database.
The wizard creates the UI model vb.Net class files from the spec. At run time, this code and the HTML file are used by the Infinity platform to create a Custom UI Model data form. Within the Solution Explorer, click Show All Files to display the code generated UI Model .NET class files. You will notice two files. One file named WeatherTest1CustomUIModelMetadataWEATHERFORECASTUIModel.CodeGen.vb contains a class that represents a weather forecast row within the collection grid. While the WeatherTest1CustomUIModelMetadataUIModel.CodeGen.vb file contains a class that represents the UI model for the data form.
HTML for Layout
Step 8 - Modify the HTML to lay out the controls and apply certain formatting styles with CSS. Within your UIModel project, overwrite the HTML file generated by the wizard with the HTML below. Be sure to verify the HTML for correctness with the Blackbaud.AppFx.UIModeling.HtmlLint.exe utility that validates the HTML file used to layout the controls in the user interface. For example, it ensures that every CSS class or style name is qualified with an element with the #MAP# prefix.
<style type="text/css">
        .#MAP#style1
        {
        text-align:left;
        padding: 0px;
        vertical-align:top
        }
</style>
<div id="#MAP#WeatherTest1CustomUIModelMetadata">
        <h2 id="#MAP#FORMHEADER_value"></h2>
		<table>
			<tr >
				<td class="#MAP#style1">
				<table>
					<tr>
						<td></td>
						<td>
							<table>
								<tr>
									<td>
										<input id="#MAP#SEARCHZIP_value" type="text" style="width: 75px" />
									</td>

									<td>
										<button id="#MAP#SEARCH_action"></button>
									</td>
								</tr>
							</table>
						</td>
					</tr>
					<tr>
						<td valign="top">
							<label id="#MAP#WEATHERFORECAST_caption" for="#MAP#WEATHERFORECAST_value"></label>
						</td>
						<td>
							<div id="#MAP#WEATHERFORECAST_value" style="height: 146px; width: 299px;"></div>
						</td>

					</tr>
				</table>
				</td>
			</tr>
		</table>
</div>
Figure: Use HTML to layout the controls for the UI Model. To verify HTML, use HTMLLint.exe.
Add a Web Reference
Our data form will receive its data form a web service, not a load implementation that calls upon data within a Blackbaud CRM database. In the following steps, we will write some UI Model code to communicate with the NOAA weather web service. After we retrieve the weather forecast data, we will place the results in a forecast grid that is collection of form fields.
Step 9 - To add a the weather web reference within the UI Model project, right-click the Service References folder within the Visual Studio 2010 project and select Add Service Reference. This opens the Add Service Reference dialog window.
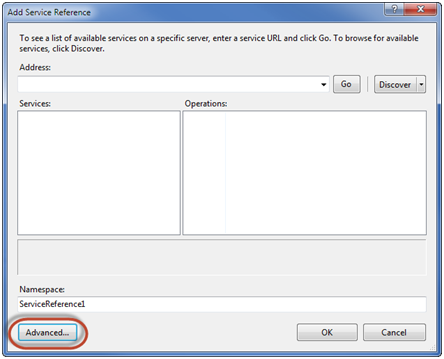
Figure: Figure 13: Use the Advanced button to add a traditional .NET 2.0 Web Service.
Step 10 - Click the Advanced button to open the Service Reference Settings dialog.
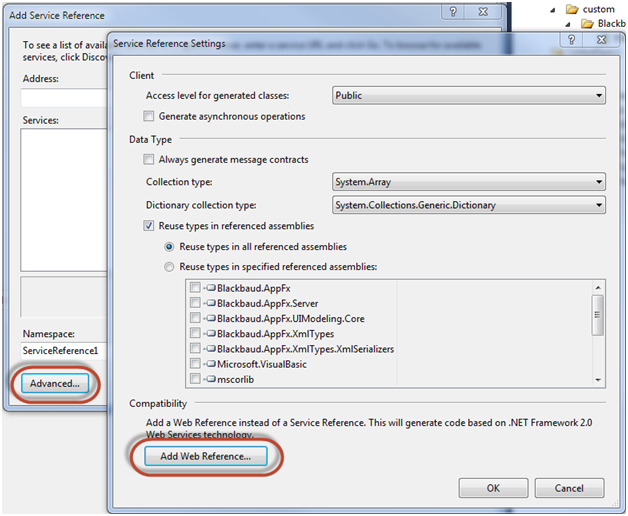
Figure: Click Add Web Reference…
Step 11 - Click the Add Web Reference button to add a traditional .NET 2.0 web service reference.
Step 12 - Paste the following web service URL into the URL text box:
http://graphical.weather.gov/xml/DWMLgen/wsdl/ndfdXML.wsdl
Step 13 - Click the green arrow button to view the services. In this sample, I name the web reference "weather."
Step 14 - Click the Add Reference button to add the reference to your project.
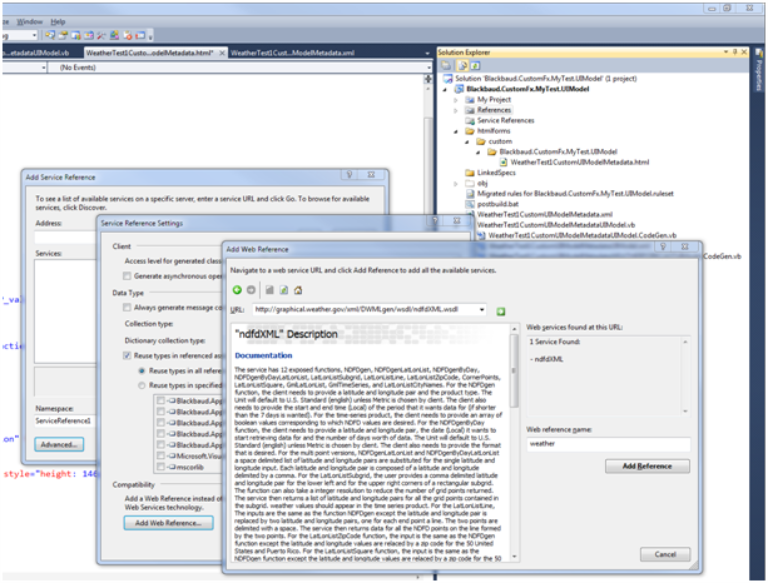
Figure: Add the web reference named "weather"
Weather Forecast Code Highlights
Note: You will need all the UI Model code for this sample to work. The entire source code can be downloaded here: CustomUIModelSample.
Within the source code, let's review some key pieces of the vb.net classes that retrieve the weather data from the web service on behalf of the user interface. Our UI Model class is named WeatherTest1CustomUIModelMetadataUIModel and is used to interact with the user interface of our Custom UI Model. At the top of the class, we declare a variable named weatherMan of type WeatherMan which is used to retrieve the weather data from the web service.
Public Class WeatherTest1CustomUIModelMetadataUIModel
  Private weatherMan As WeatherMan
When the end user clicks the search button (UI Action), an event handler for the UI action within the UI model code utilizes the WeatherMan class to retrieve the weather forecast. The event handler named _search_InvokeAction handles the _search.InvokeAction event emitted from the search UI Action.
Private Sub _search_InvokeAction(sender As Object, e As AppFx.UIModeling.Core.InvokeActionEventArgs) Handles search.InvokeAction
  DisplayForecast(DetermineCoordinates)
End Sub
In the code snippet above, we can see the DetermineCoordinates private function is called before DisplayForecast. DetermineCoordinates is used to call the GetLatLonByZip function on our WeatherMan class. The ZIP code form field value is passed into GetLatLonByZip, which calls the web service's LatLonListZipCode function and returns an object of type LatLongResult. LatLongResult represents the coordinates for the ZIP code and contains two properties representing the latitude and longiture for the ZIP code.
Private Function DetermineCoordinates() As LatLongResult
	Dim Point As LatLongResult
	Point = weatherMan.GetLatLonByZip(Me.SEARCHZIP.Value.ToString)
	Return Point
End Function
With the coordinates for the ZIP code resolved, we call the DisplayForecast, which calls GetDailyForecast on the WeatherMan object, which calls the web service's NDFDgenByDay function to retrieve the weather forecast. The results of the weather forecast are returned as an array of WeatherResult which contains the DateTime, LowTempF and HighTempF, and cloud icon. We will display the data within this array within our collection grid on the user interface. Every thing but the cloud icon is displayed.
Private Sub DisplayForecast(Point As LatLongResult)
	Me.WEATHERFORECAST.Value.Clear()
	Dim weather() As WeatherResult
	weather = weatherMan.GetDailyForecast(Point.Latitude, Point.Longitude, System.DateTime.Now, 7)
	Dim WeatherForecastRow As WeatherTest1CustomUIModelMetadataWEATHERFORECASTUIModel
	For Each Day As WeatherResult In weather
		WeatherForecastRow = New WeatherTest1CustomUIModelMetadataWEATHERFORECASTUIModel
		WeatherForecastRow.DATE.Value = Day.DateTime
		WeatherForecastRow.HIGHTEMP.Value = Day.HighTempF
		WeatherForecastRow.LOWTEMP.Value = Day.LowTempF
		Me.WEATHERFORECAST.Value.Add(WeatherForecastRow)
	Next
End Sub

Public Class WeatherMan
	Private _weatherSvcProxy As New weather.ndfdXML
	Private _weatherXMLData As String
	Protected Friend Function GetDailyForecast(latitude As Decimal, longitude As Decimal, startDate As DateTime, numDays As Integer) As WeatherResult()
		Dim _weatherdataXMLdoc As Xml.XmlDocument
		_weatherXMLData = _weatherSvcProxy.NDFDgenByDay(latitude, longitude, startDate, numDays, weather.unitType.e, weather.formatType.Item12hourly)
		_weatherdataXMLdoc = New Xml.XmlDocument
		_weatherdataXMLdoc.LoadXml(_weatherXMLData)

		Dim highs As Xml.XmlNodeList = _weatherdataXMLdoc.SelectNodes("/dwml/data/parameters/temperature[@type='maximum']/value/text()")
		Dim lows As Xml.XmlNodeList = _weatherdataXMLdoc.SelectNodes("/dwml/data/parameters/temperature[@type='minimum']/value/text()")
		Dim cloudIcon As Xml.XmlNodeList = _weatherdataXMLdoc.SelectNodes("/dwml/data/parameters/conditions-icon/icon-link/text()")

		Dim forecastData(numDays - 1) As WeatherResult
		For x = 0 To numDays - 1
			forecastData(x) = New WeatherResult
			If highs(x) Is Nothing Then
				forecastData(x).HighTempF = String.Empty
			Else
				forecastData(x).HighTempF = highs(x).Value
			End If
			If lows(x) Is Nothing Then
				forecastData(x).LowTempF = String.Empty
			Else
				forecastData(x).LowTempF = lows(x).Value
			End If
			If cloudIcon(x) Is Nothing Then
				forecastData(x).CloudIconURL = String.Empty
			Else
				forecastData(x).CloudIconURL = cloudIcon(x).Value
			End If
			forecastData(x).DateTime = startDate.AddDays(x)
		Next
		Return forecastData
	End Function

	Protected Friend Function GetLatLonByZip(zipCode As String) As LatLongResult
		Dim _weatherdataXMLdoc As Xml.XmlDocument
		_weatherXMLData = _weatherSvcProxy.LatLonListZipCode(zipCode)
		_weatherdataXMLdoc = New Xml.XmlDocument
		_weatherdataXMLdoc.LoadXml(_weatherXMLData)

		Dim point As Xml.XmlNodeList = _weatherdataXMLdoc.SelectNodes("/dwml/latLonList/text()")
		Dim PointValue() As String = point(0).Value.ToString.Split(",")
		Dim LatLongResult As New LatLongResult

		LatLongResult.Latitude = CDec(PointValue(0))
		LatLongResult.Longitude = CDec(PointValue(1))

		Return LatLongResult
	End Function
End Class
Display the Custom UI Model
After the Custom UI Model data form is created, we will need a way to display it to the end user within the Web Shell user interface. One option is to display the Custom UI Model from within a section within a page definition spec. Alternatively, we can open the Custom UI Model directly from a task spec. Below we will demonstrate each technique.
Step 15 - Create a Visual Studio catalog project to hold the specs. Add a project named Blackbaud.CustomFx.MyTest.Catalog. This project should live in the same solution as the UI Model project we created earlier.
The catalog project contains a functional area spec that organizes the task specs. The project will contain a page definition spec to display the Custom UI Model. Finally, a package spec organizes and deploys the catalog items/specs in an orderly fashion.
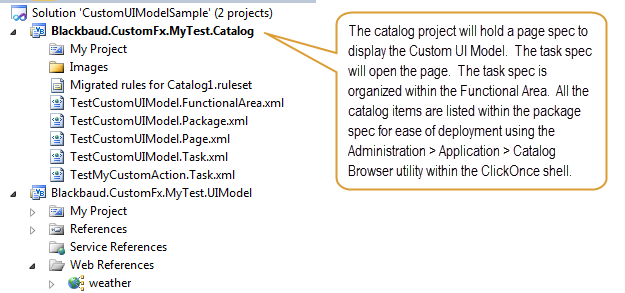
Figure: The catalog project contains the page, task, functional area, and package specs used to display the Custom UI Model.
Display the Custom UI Model on a Page
Step 16 - Create a page definition spec catalog item and add it to the catalog project.
Use the figure below as a guide to reference the Custom UI Model within a section on the new page.
UI widgets support Custom UI Models for the scenario where you need to retrieve data through some mechanism other than the ones provided by view forms. Page sections are a natural place to display Custom UI Models. To add a Custom UI Model to a page, simply specify a section with a CustomUIModel child element.
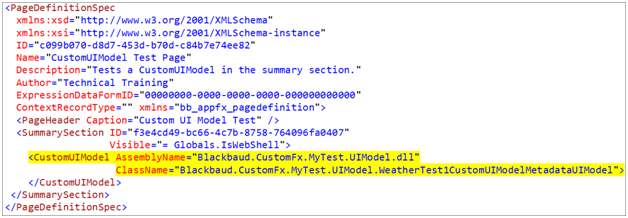
Figure: Reference the Custom UI Model within a page
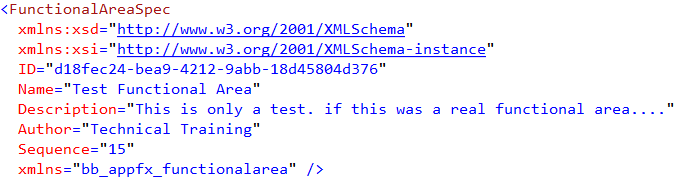
Step 17 - Use the figure below as a guide to add a functional area spec to your catalog project. In the figure, the test functional area is named "Test Functional Area." How original!
Step 18 - Use the figure below as a guide to create a task spec to open the page that displays the Custom UI Model form. Assign the task to a functional area of your choosing. In the example below, the task lives in a test functional area named "Test Functional Area."
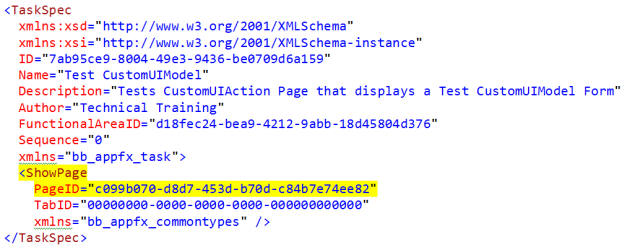
Figure: Use a TaskSpec to open the page that contains a reference to the Custom UI Model dialog form. Tasks are organized into a functional area.
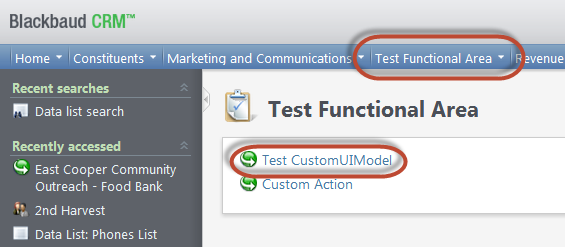
Figure: Above we see the task which opens the page. Tasks are organized into a Functional Area.
Step 19 - In Visual Studio, use LoadSpec to load the page, functional area, and task specs into the catalog system.
Alternatively, you can create a Package Specs to reference these catalog items/specs and use Administration > Application > Catalog Browser to deploy the specs in an orderly, controlled fashion.
Step 20 - Open/refresh Web Shell in the web browser.
Note: CustomUIModel page sections are not supported in ClickOnce and are only displayed in the Web Shell user interface. For details, see Webshell only.
After you add the specs to the catalog system, refresh the browser, click the task within the functional area to display the page with the Custom UI Model:
Figure: Display a Custom UI Model on a page. Nice weather in Mount Pleasant, South Carolina.
Display a Custom UI Model from a Task Spec
Note: For a demonstration of how to open a Custom UI Model with JavaScript and a task spec, see Displaying a Custom UI Model from a Webshell Custom Action.
Display a Custom UI Model from Batch
For a demonstration of how to create a dialog screen for a Web Shell-based batch, see Create Batch Dialog Screens.
Review
-
A custom component is based on WinForm technology and does not work in the Web Shell.
-
A custom component must be converted to a Web Shell-compliant feature such as a UI model-based data form, Custom UI Model, or UI Widget.
-
A Custom UI Model page section does not work in the ClickOnce Smart Client.
-
Unlike a data form, a Custom UI Model does not use a load or save implementation to retrieve data from the database. Instead, data retrieval occurs within the UI Model code.
-
A Custom UI Model is generated from a Custom UI Model spec.
-
The Custom UI Model spec contains form fields, UI actions, etc. just like a regular data form spec. A Custom UI Model spec does not contain a load and save implementation.
-
Unlike a data form spec, the Custom UI Model spec is not loaded into the catalog system; it is used simply as a means to generate the UI Model representation of the form.
-
Use HTML to layout the user interface on the Custom UI Model, just like a UI model-based data form.
-
A Custom UI Model can be viewed within a page section using a CustomUIModel element within a page section.
-
A Custom UI Model can be viewed as a standalone form using a custom JavaScript action.
-
A Custom UI Model can be opened from a parent data form or batch as a dialog screen to collect additional data related to the parent or to aid in complex data entry.
Conclusion
Custom UI Models support the ability to provide custom data forms that can be displayed on a page or that can be used to ease data entry within a batch or a complex data form. The availability of Custom UI Model sections should make it easier to convert Winform custom components to be Web Shell-compatible without creating unnecessary stored procedure or CLR classes that would be required if using a view form. Custom UI Model page sections do not work in the ClickOnce Smart Client.