Get Started with Ad-hoc Query
Query is a powerful tool you can use to help filter and group records. While it can be a bit intimidating at first, this guide will help you get started.
Query basics
With Query, you can group records according to any criteria you want. Before you begin building your query, think about what records you want to see. Form a statement, such as “I want to see the names of all constituents who are members and have given a gift this month, listed alphabetically by last name.” Be as specific as possible — you can even write down your statement to help.
Tip: Queries are all about fields. Remember when you entered a birth date on a constituent record? That’s the Constituents: Birth date field in a query.
Build a query
At the simplest level, a query answers four basic questions, which correspond to the four main components of a query: source view, filters, output, and sort/group options.
-
What type of info or records are you looking for?
-
What specific parameters do you have?
-
What do you want to see in the output?
-
How do you want the results displayed?
Let's break down the following statement to see which parts match each of the four questions: I want to see the names of all constituents who are members and have given a gift this month, listed alphabetically by last name.
-
The names — This tells us we want to see names in the results. This is the query’s Output.
-
Of all constituents — This tells us that we need a constituent query, which means we’ll use the Constituents Source View to create the query.
-
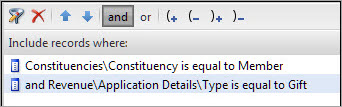
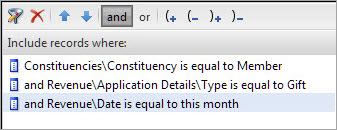
Who are members and have given a gift this month — We want to see members, so we can use the constituency as a Filter. If the constituency is equal to member, we match on the first part. So let’s look at the rest of it. “...and have given a gift this month” makes things a little more complicated. So we’ll need another filter to find the gifts in that time frame.
-
Listed alphabetically by last name — This tells us how we want to Sort the results.
Now let’s look at each question individually so we can learn about the parts of the query and how we can build it.
The answer to this question determines which source view to choose. Based on the statement “I want to see the names of all constituents who are members and have given a gift this month, listed alphabetically by last name,” we know to use the Constituents source view.

Tip: For a list of commonly-used filters, see Common Query Filters.
The purpose of this question is to help determine the filters we’ll need. Which records do we want to include? Do we want to see only constituents who are major giving prospects? Or board members? Or volunteers? Do we want to see only revenue given in the last month or year? In our case, we know we want to see members who have given a gift this month.
On the Select filter and output fields tab, you select your parameters (or "filters") to help narrow down the results.
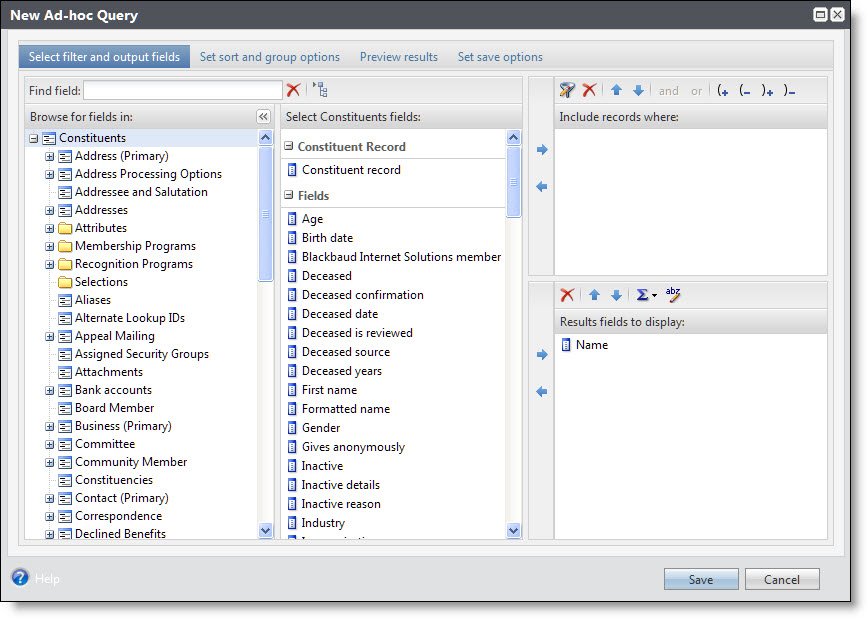
Under Browse for fields in, you see the field hierarchy that groups similar fields together into expandable nodes. For example, all of the fields associated with constituencies are grouped together under the Constituencies node. When you select Constituencies under Browse for fields in, these fields appear in the center column.
After we select fields, we sometimes need to make additional decisions. For example, if we use a date field as a filter, we must decide whether to filter on today’s date, a date range, or some other specific date.
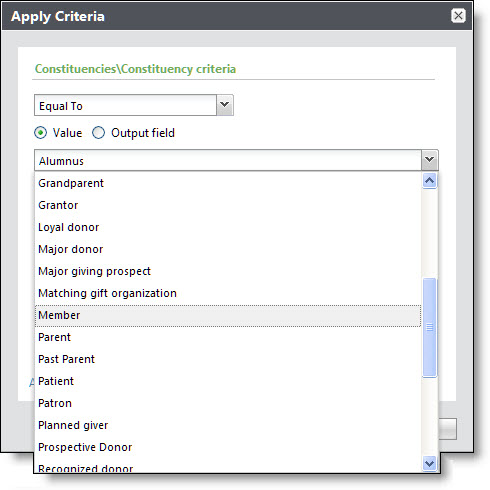
Often, we need more than one filter. The filter options allow us to use different filters together. For our example, we need to use a couple of filters to show us members who have given us a gift this month. But to start us off, we need a filter to show constituency equal to member. To find the Constituency field, we need to select Constituencies under Browse for fields in. Then the Constituency field appears in the center column. After we drag the field into the Include records where section, we can select the criteria operator and the values we want to use. So we would say: Constituency is Equal To Member, where “Constituency” is the field, “Equal To” is the criteria operator, and “Member” is the value to use.
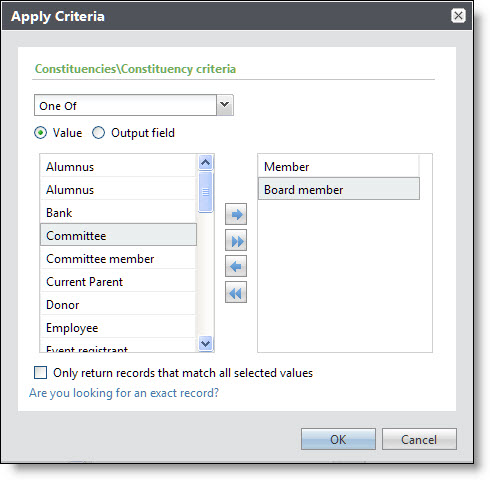
If we wanted to see all members AND all board members, we could select the criteria operator “One Of” instead of “Equal To,” and then pick both “Member” and “Board member.”
We also could have picked other criteria operators, such as “Not Equal To” or “Blank.” You can experiment with them to get a feel for how each one works. For more information, see Query Criteria Operators.
Now we need to get creative with filters and combine them in order to see members who have given a gift this month. Let’s take the “given a gift” part of our statement. For gifts, we’ll need to select Constituents > Revenue > Application Details: Type and set that filter equal to gift.
But we still have one more piece: this month. Now that one isn’t too difficult. That’s just the Constituents > Revenue: Date field. And we’ll need to set that equal to this month!
Here are a few other examples of filters. Can you figure out what these filters mean?
-
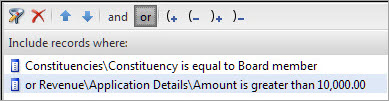
Constituencies\Constituency is equal to Board member — This first part tells us the constituency must equal “Board member.”
-
Revenue\Application Details\Amount is greater than $10,000.00 — The second part tells us the revenue amount must be greater than $10,000.
Did you notice the OR before the second one? That tells us the constituent can meet either criteria and still be included. You might have a board member who has given only $5,000 and you might have a major donor who has given $100,000—both would show up in the results. If we used AND instead of OR to connect the two, only board members who had given more than $10,000 would be included.
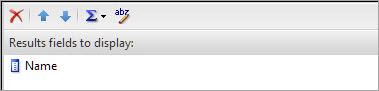
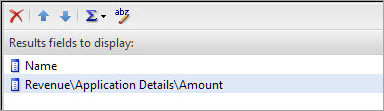
This question provides us with the output fields for our query. The fields we include under Results fields to display help verify that our results match what we’re trying to accomplish. That means we want to include enough fields for us to tell if we’re really seeing “the names of all constituents who are members and have given a gift this month, listed alphabetically by last name.” So at a minimum, we know we want name as an output field.
What if we wanted to see the amount of the gift too? We’ll need to also add Constituents > Revenue > Application Details: Amount. Remember, when we see the gift amounts in the output, we're only seeing the gifts that were given this month because of the filter we added.
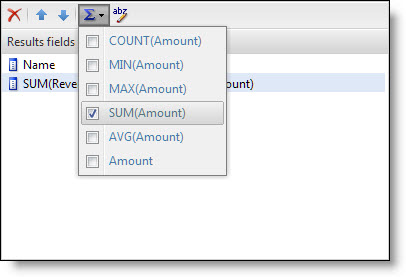
But what happens if a member has given a couple of gifts this month? That constituent would show up twice in our results—once for each gift. So maybe what we really want to see is the total amount of all the gifts each member has given us this month. For that, we need the Summarize button.
The Summarize button can do different things depending on the function we select and the field we use it with. The results of the Summarize button are also impacted by the fields in our output.
For our amount field, we can click the Summarize button and use the SUM function to show us a calculation of the field results rather than the actual contents of the field. So what does this really mean? If a member gave us two gifts this month—$50 and $100—then we could summarize the amount so the results would include the member only one time, with gift amount combined as $150. So what we need to do is select the amount field in the Result fields to display section, click the Summarize button, and select SUM (Amount).
Tip: For more information about all the functions that are available, see Summarize Query Output.
This question provides us with the sort options for our query. Do we want to list constituents in alphabetical order? Do we want to list revenue by amount or by date? Let’s look back at our statement: We wanted to see constituents in alphabetical order. You configure this under the Set sort and group options tab.
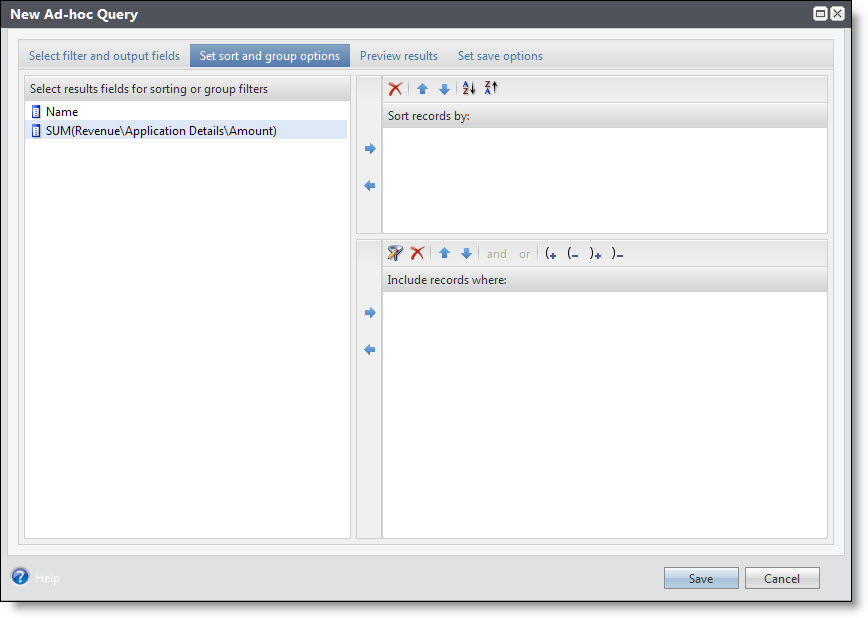
We can sort our query results only by fields included in our output. In our statement, we said we wanted to see members, listed alphabetically by last name. We wanted to sort by name in ascending order, which means A to Z.

Note: If something's missing, or if you have a new idea about how to sort your results, you can go back and add more fields to the output.
Keep in mind that queries are a way to group records. We can save the results of the query to use elsewhere in the program or even export the results to a spreadsheet.
Under Include records where, this section is a way to extend the use of a summarized output field. Remember how we used the SUM function for the output fields on the Select filter and output fields tab of our query? This gave us the total amount each member gave this month, instead of having each gift on a separate line.
What if we wanted to summarize the giving but also extend that summarized information as yet another filter in our query? What if we wanted to see only the members who gave $100 or more this month? For that, we need to use the summarized amount field under Include records where on the Set sort and group options tab, too.

View results
Before we check our results, let’s review our original statement: We want to see the names of all constituents who are members and have given a gift this month, listed alphabetically by last name. Plus we want to see the amount of their gifts this month summarized instead of seeing each gift separately.
Now we can go to the Preview results tab to preview the query output. check to see if things look okay, but . . . wait! The names are sorted alphabetically, but by the whole name, not the last name! So we have Christopher Young before Elizabeth Ashton—not exactly what we were expecting.
Remember how we talked about getting to the end and realizing we need to take a step or two back to add other fields to the output or change the sort order to see exactly what we want?
-
Return to the Select filter and output fields tab and add the last name to the Results fields to display section. We’re looking for the Constituent: Last/Organization/Group/Household name field.
-
Select the Set sort and group options tab to sort by last name only. Let’s make those changes and take another look at the Preview results tab.
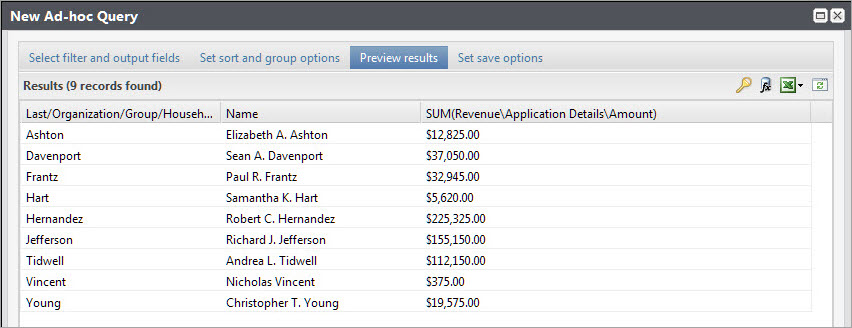
This looks great! It’s just what we were expecting, which means we built our query correctly! Now we can let our membership director know about each of these loyal and generous members! If she wants to use query results elsewhere in the program, we can create a selection of the results for her. Because the selection is based on the record ID—of the constituents who are members in our case—a mailing process will have access to all the other information about the constituents, such as addresses. So we wouldn’t need to include that information as output in the query. See Create Selections from Queries for more information, including special rules for summarized fields!
Note: If we want to use our query results outside of the program, like in a spreadsheet, we can export the results. However, if we do this, we get exactly what shows up on the Preview results tab. If we summarized revenue, we’ll have only the total and not each individual gift. If we didn’t include a date field, then no date. Check out Export Queries for information on how to export our results.
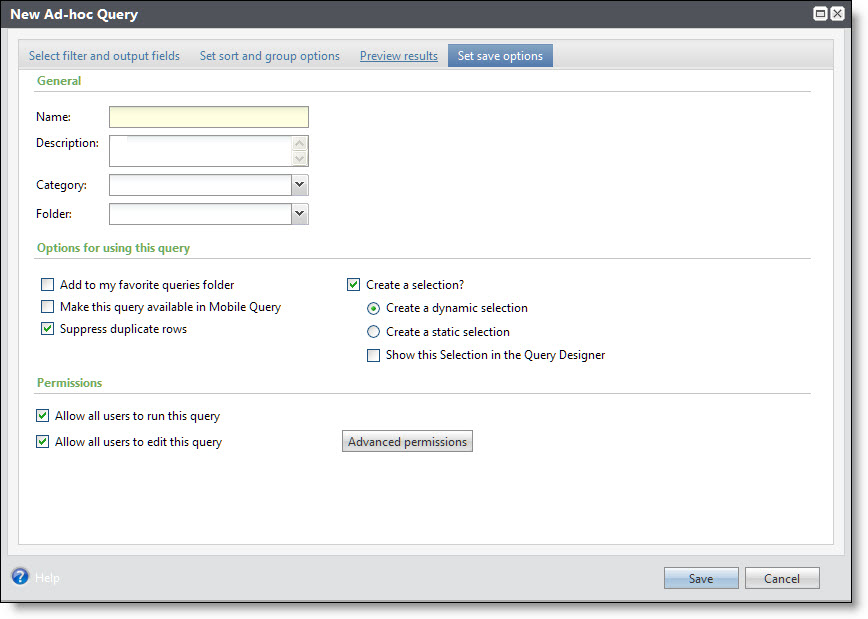
Now that we have the query squared away, let's give it a name and save it so we can find it again in the future. On the Set save options tab, we can name the query and describe its criteria and output. We can also assign it a category or folder to organize it with similar membership queries. Before we save the query, we can also select to create that selection for the membership director and select whether to allow other users to update the query.