Blackbaud CRM SDK Developer Environment Setup
Overview
This guide is intended to be used by third-party developers who will work on Blackbaud CRM customizations. Developer machines must meet installation requirements for Blackbaud CRM; refer to the table below for prerequisites.
| Article | Link |
| Blackbaud CRM Installation Requirements | https://www.blackbaud.com/files/sysreqs/bbecreqs.pdf |
Installation Instructions
Developers need to install Internet Information Services (IIS), Visual Studio, SQL Server, Blackbaud CRM, Blackbaud CRM SDK, and SQL Server Reporting Services (SSRS) for reporting in the developer environment. If the developers wish to host CRM databases on their local developer machines, SQL Server must be installed; otherwise, SQL Server must be installed on a separate development server, and the developer's machine needs the SQL Server Management Studio client installed. (These instructions assume a local install of SQL Server.)
Step 1 - Install Internet Information Services (IIS)
Enable the Indexing Service and install Internet Information Services (IIS). Refer to the instructions specific to the developer environment's OS.
Windows Vista
-
Open Control Panel > Programs > Programs and Features.
-
Click Turn Windows features on or off.
-
Select Indexing Service.
-
Select and expand Internet Information Services.
-
Enable all features under Internet Information Services > World Wide Web Services.
-
Enable IIS 6 Management Compatibility and IIS Management Console under Internet Information Services > Web Management Tools.
Windows 2008 Server / Windows 7
-
Open Server Manager.
-
Right-click Roles and select Add Roles.
-
Add File Service and Web Service (IIS) Roles.
-
Ensure the following Web Service Role services are installed.
-
Common HTTP Features (default sub options)
-
Application Development (default sub option
-
Health and Diagnostics (default sub options)
-
Security - Check Windows Authentication
-
Performance (default sub options)
-
Management Tools (all sub options) (Ensure IIS 6 Management Compatibility is included)
-
-
Ensure the following File Role Services are installed.
-
File Server
-
Window Server 2008 File Services (all sub options)
-
Windows XP / 2003 server
-
Open Control Panel > Add/Remove Programs.
-
Click Add/Remove Windows Components.
-
Select Indexing Service and Internet Information Services (IIS).
-
Install and register the latest ASP .NET.
-
Run the following command: %WINDIR%\Microsoft.NET\Framework\v2.0.50727\aspnet_regiis.exe /i.
Step 2 - Install Visual Studio 2008 / 2010 Developer Edition
Install the Developer Edition of Visual Studio 2008 or Visual Studio 2010.
Blackbaud Infinity SDK version 2.91 and higher have dependencies on .NET 4.0, and therefore requires Visual Studio 2010.
-
Install Visual Studio 2008 and/or Visual Studio 2010 Developer Edition (depending on the version of Blackbaud CRM that you will develop against)
-
Install Visual Studio 2008 SP1 and/or Visual Studio 2010 SP1 (depending on which version of Visual Studio is installed)
For Microsoft's guidance, refer to the following resources:
| Article | Link |
| Install Visual Studio 2008 | http://msdn.microsoft.com/en-us/library/e2h7fzkw(v=vs.90) |
| Install Visual Studio 2010 | http://msdn.microsoft.com/en-us/library/e2h7fzkw(v=vs.100)#installing |
Step 3 - Install Microsoft SQL Server Enterprise
Install Microsoft SQL Server 2008 Enterprise SP2, or SQL Server 2008 R2 Enterprise on machines used to host the Blackbaud CRM database, and each machine to host Reporting Services.
The general install options are as follows:
-
Install a New SQL Server stand-alone installation
-
Select the following features.
-
Database Engine Services
-
Analysis Services
-
Reporting Services
-
Integration Services
-
Business Intelligence Development Studio (BIDS)
-
Both Management Tools
-
-
Select Default Instance if this is the only SQL Server version installed. Otherwise, create a named instance.
-
Note: For the least amount of conflicts, install 2008 as your default instance
-
-
Set the following Service Accounts (these settings in particular should NOT be used in Production).
-
SQL Server Database Engine: NT AUTHORITY\SYSTEM
-
SQL Server Analysis Engine: NT AUTHORITY\NETWORK SERVICE
-
SQL Server Reporting Services: NT AUTHORITY\NETWORK SERVICE
-
SQL Server Integration Services: NT AUTHORITY\NETWORK SERVICE
-
SQL Server Agent: NT AUTHORITY\NETWORK SERVICE
-
-
SQL Server should be configured to allow both SQL Server and Windows authentication.
-
Setup Collation
-
In the same window as Service Accounts, click Collation tab.
-
Click Customize button for Database Engine.
-
Select Windows collation designator and sort order.
-
Set Collation designator: Latin1_General.
-
Check Accent-Sensitive.
-
-
For Database and Analysis Account Provisioning, Click Add Current User
-
Select Install native mode for Reporting Services
-
Complete Installation
-
After Installation
-
Open Start > All Programs > Microsoft SQL Server 2008 > Configuration Tools > SQL Server Configuration Manager.
-
Select SQL Server Network Configuration.
-
Select Protocols for MSSQLSERVER.
-
Enable Named Pipes and TCP/IP connections.
-
Restart SQL Server.
-
Enable CLR.
-
Open SQL Server Management Studio and execute the Enable CLR SQL snippet listed below.
Exec sp_configure 'clr_enabled', '1'
RECONFIGURE WITH OVERRIDE;
EXEC sp_configure;
-
| Article | Link |
| Install SQL Server 2008 | http://msdn.microsoft.com/en-us/library/ms143219(v=sql.100).aspx |
| Install SQL Server 2008 R2 |
http://msdn.microsoft.com/en-us/library/ms143219(v=sql.105).aspx or |
Step 4 - Configure SQL Server Reporting Services (SSRS)
After you install SQL Server, you must configure Reporting Services using the following steps:
-
Ensure SQL Report Service is running.
-
Open Control Panel > Administrative Tools > Services.
-
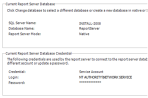
Ensure SQL Server Reporting Services (MSSQLSERVER) is present and started:

-
Open Start > All Programs > Microsoft SQL Server 2008 > Reporting Services Configuration Manager.
-
Connect to the Reporting Services Instance.
-
Server Name: <local_computer_name>
-
Instance: MSSQLSERVER
-
-
Select Service Account from the sidebar menu. (Ensure Report Server Service Account is set to Network Service credentials.)
-
Select Database from the sidebar menu .
-
If no database is listed… (Otherwise skip step)
-
Click Change Database.
-
Select Create a new report server database.
-
Server Name: local computer name .
-
Authentication Type: Current User – Integrated Security
-
Test the connection; troubleshoot any connections issues before continuing.
-
Database Name: ReportServer
-
Language: English
-
Report Server Mode: Native Mode
-
Credentials \ Authentication Type: Service Credentials
-
Finish .
-
-
Verify settings.
-
INSTALL-2008 should be replaced with local computer name
-
-
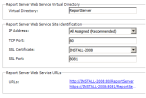
Select Web Service URL from the sidebar menu.
-
The virtual directory should be set to ReportServer.
For Windows XP the port may need to be set to 8080 to avoid conflicts with sites hosted by IIS on port 80 (see http://technet.microsoft.com/en-us/library/bb630449.aspx )
-
Do not configure SSL for now. (Disregard SSL settings in the screenshot below.)
-
Click Apply Changes.
-
For Microsoft's guidance, refer to the following resources:
| Article |
Link |
| Reporting Services Configuration Manager |
Step 5 - Install Blackbaud CRM
The following steps outline the installation of Blackbaud CRM, including the necessary post-installation configurations.
Restore Blackbaud CRM Database
The Blackbaud CRM installer requires that a database be selected during installation. Therefore, prior to installing Blackbaud CRM, a Blackbaud CRM database must be restored in SQL Server. This database may be of sample data, or of the customer’s converted data; however, the version of the database must match the version of the installed Blackbaud CRM application. After the Blackbaud CRM is restored, the database encryption must be reset.
Refer to the table below for guidance on restoring a database in SQL Server, and resetting the database encryption.
| Article |
Link |
| Restore Blackbaud CRM Database in SQL Server |
or http://msdn.microsoft.com/en-us/library/ms177429(v=sql.100).aspx |
| Reset Database Encryption | https://www.blackbaud.com/files/support/infinityinstaller/content/installermaster/coresetdatabaseencryption.htm |
| SQL Server and Database Encryption Keys (Database Engine) |
Install Blackbaud CRM
After the Blackbaud CRM database is restored and the encryption is reset, Blackbaud CRM may be installed using the Blackbaud Installer. When installing Blackbaud CRM, the user should elect to install the Blackbaud Core Components which installs the Infinity web application, which is used to access different areas and features of the program. The Core Components must be installed on a web server during new installations and upgrades.
The Blackbaud CRM Installer may be downloaded from the Blackbaud.com web site. (Note: A password for the downloads page on Blackbaud.com is required. Only the downloads available to your organization appear. There may be multiple versions of Blackbaud CRM available.)
The Blackbaud CRM Installer is an executable file. When running the Installer, if your login does not run executables as an Administrator by default, right-click the executable and select Run as administrator.
After the Blackbaud CRM Installer is launched, you will be prompted to enter the unique client (site) ID you received from your Blackbaud account manager, and the email address associated with your account. The Blackbaud Installer uses these credentials to ensure the installation includes all features your organization purchased.
Instructions to install Blackbaud CRM core components may be found here.
Step 6 - After You Install Blackbaud CRM
Check out the After You Install section within the installation instructions for items such as accessing the application, determining the version number and patch number, loading reports, adding application users and system roles, Active Directory Integration, Exchange Server Integration, and deploying the Data Warehouse.
Step 7 - Set Up Customization Assembly Folders on the Blackbaud CRM Application Server
By default the Blackbaud CRM application looks within in the bbappfx\vroot\bin folder for server-side customization assemblies, and the bbappfx\vroot\browser\clientbin folder for client-side customization assemblies.
As a best practice, the customization assembly files should be kept separate from the standard assembly files so they can be easily identified. A flag can be set in the web.config file to cause the application to look for folders named “custom” for customization assemblies. To enable this:
-
Open the web.config file in the bbappfx\vroot\bin folder.
-
Look for a line towards the top that is commented out and appears like the following: <!--<probing privatePath="bin\custom" />-->.
-
Un-comment this line and save the file: <probing privatePath="bin\custom" />.
The application will now search in bbappfx\vroot\bin\custom and bbappfx\vroot\browser\clientbin\custom for server-side and client-side customization assembly files.
Step 8 - Add a Custom HTML Folder on the Blackbaud CRM Application Server
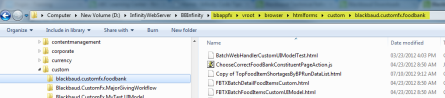
As a best practice, HTML files used by features for user interface control layout should be placed within a project sub folder of the "custom" folder in the \bbappfx\vroot\browser\htmlforms directory. JavaScript files used to provide user interface logic for features should be placed here as well. Add a custom folder. Add project sub folders to the custom folder as needed.
-
On the application server navigate to the \bbappfx\vroot\browser\htmlforms folder
-
Add a "custom" folder to the \bbappfx\vroot\browser\htmlforms folder.
Your customization projects which utilize HTML files for user interface layout and JavaScript for advanced user interface functionality should have sub folders for within the \bbappfx\vroot\browser\htmlforms\custom folder. For example, the UI Model project for the food bank code sample is named Blackbaud.CustomFx.FoodBank.UIModel. Therefore, a directory named blackbaud.customfx.foodbank has been added to the \bbappfx\vroot\browser\htmlforms\custom folder for the project. As a result, the .html and .js files for the food bank project should reside within the \bbappfx\vroot\browser\htmlforms\custom\blackbaud.customfx.foodbank folder.
Step 9 - Update Web.Config Connection Strings
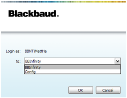
Blackbaud CRM allows a single application installation to connect to multiple databases. This provide users the option to access different databases from the drop-down menu on the ClickOnce Smart Client login screen; for example:
To Set Up a Single Database Connection String:
-
Open the web.config file in the “bbappfx\vroot\bin” folder.
-
In the <appSettings> tag look for a tag with the key “REDBList”, for example: <add key="REDBList" value="BBInfinity " />
-
Each entry in the “value” attribute corresponds to an entry in the <connectionStrings> tag found further down in the web.config file. For example, the above entry has this corresponding connection string:
<connectionStrings>
	<add name="BBInfinity" connectionString="Server=(local);database=BBInfinity;integrated security=sspi" />
</connectionStrings>
To Set Up Multiple Databases:
To associate multiple databases to a single Blackbaud CRM installation:
-
Multiple entries can be set in the in the “value” attribute in the REDBList application setting, separated by a semicolon:<add key="REDBList" value="BBInfinity;Config" />
-
Each value will correspond to an entry in the <connectionStrings> tag found further down in the web.config file. For example, the above entry has this corresponding connection strings:
<connectionStrings>
	<add name="BBInfinity" connectionString="Server=(local);database=BBInfinity;integrated security=sspi" />
	<add name="Config" connectionString="Server=(local);database=BBInfinity_Config;integrated security=sspi" />
</connectionStrings>
Step 10 - Reduce Spec Cache Timeout and Recycling the Application Pool
The Infinity platform employs caching at multiple levels to reduce spec retrieval times (since specs are not expected to change very often). However, during spec development, the XML will be reloaded often as changes are made and assessed. In order to avoid pulling cached copies of the spec after loading changes, the following changes should be made in the web.config file:
-
Open the web.config file in the “bbappfx\vroot\bin” folder.
-
In the <appSettings> tag look for a tag with the key “MAX_METADATA_CACHE_SECONDS” that may be commented out, for example: <!--<add key="MAX_METADATA_CACHE_SECONDS" value="10" />-->
-
Un-comment this line, set the value to “0”, and save the file:<add key="MAX_METADATA_CACHE_SECONDS" value="0" />
-
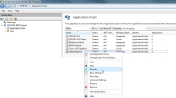
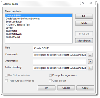
Each Infinity application will be assigned to a specific Application Pool. Using the IIS Manager (INETMGR.exe), a developer can recycle the appropriate application pool to clear out the web cache on their development environment. Typically this is the DefaultAppPool unless specified otherwise during the install of the core components. In addition to recycling the application pool from the IIS Manager user interface, you can also recycle from Visual Studio by setting up some syntax as an external tool or adding the command syntax in the post-build event. For more details, see Recycle an Application Pool Using External Tools in Visual Studio.
Step 11 - Install Blackbaud Infinity SDK
Each developer should install the Blackbaud Infinity SDK in order to build custom features. The Blackbaud Infinity SDK can be downloaded from the Blackbaud.com website.
Before you install the SDK, you must install a program on the Infinity platform, such as Blackbaud CRM. If you don't have an Infinity program and its database in place, the SDK installation will fail.
The version of Blackbaud Infinity SDK must also match the version of Blackbaud CRM. (For example, if you use Blackbaud CRM version 2.93, then you need to install the 2.93 version of the SDK.) As part of the installation process, the Blackbaud Infinity SDK installation wizard associates the SDK with the SQL Server instance and database for your Infinity programs. And starting with SDK version 3.0, the installation wizard also allows you to specify a default spec author for catalog items, a default prefix for the database artifacts, and default folders for creating projects and building projects.
Refer to the resources in the table below to access the Blackbaud Infinity SDK downloads page on Blackbaud.com, as well as the SDK system requirements.
| Article |
Link |
| Infinity SDK System Requirements and Install (Login required) | https://www.blackbaud.com/default.aspx?pgpId=2255&ID=193&Bundle=Blackbaud+Infinity+SDK |
| Infinity SDK Development Guides |
https://www.blackbaud.com/files/support/guides/infinitydevguide/infsdk-developer-help.htm |
SDK version 2.91 and higher have dependencies on .NET 4.0 and therefore will require Visual Studio 2010. If you set references to any of Infinity SDK assemblies that have dependencies on the .NET Framework 4.0, we will need to utilize .NET Framework 4.0 and Visual Studio 2010.
Switching Between Versions of Blackbaud Infinity SDK
A developer may have more than one version of Blackbaud CRM and SDK installed at the same time in different folders on the file system.. For example, if the developer is supporting version 2.93 and 2.94 of Blackbaud CRM, then that developer will have two versions of CRM and SDK installed in two different folders..
On the developer’s machine, use SetCurrentSDK.bat within the SDK folder to switch between the different SDK versions. The batch file is included with the SDK and may be found within the SDK folder. Navigate to the folder containing the version of the SDK you wish to switch to, and run the SetCurrentSDK.bat file as Administrator.
Step 12 - Configure LoadSpec
LoadSpec is a utility that adds Infinity catalog specs into an Infinity installation. LoadSpec is installed into Visual Studio as an external tool when the Blackbaud Infinity SDK is installed, and is accessible from the Tools menu within Visual Studio.
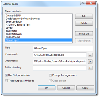
LoadSpec may be configured in Visual Studio, if necessary, following these steps :
-
Find the path to the LoadSpec executable. It is a part of the SDK folder for the Infinity SDK (for example, C:\SDK\Tools\LoadSpec.exe).
-
In Visual Studio, from the Tools menu, click External ToolsThe External Tools screen appears:

-
Click Add. A new tool entry appears.
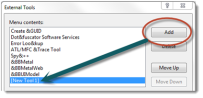
-
In Title, enter: &Load Spec (this determines how the menu item will appear in Tools)
-
In Command, enter the path to the executable. For example, C:\SDK\Tools\LoadSpec.exe. This executable runs when you select the menu item determined in the Title field
-
In Arguments, enter the following as one line:
-
/s= followed by your SQL Server name. For example /s=MJHFX99\MSSQLSERVER2008R
-
/db= followed by your database name. For example /db=Shelby
-
/spec=$(ItemPath), which indicates the path to the spec of the file in the active window in Visual Studio
-
/nodepends, which indicates to ignore dependencies
-
-
To display the results of the command, select Use Output window
-
Click OK.
Refer to the following resources for more information on LoadSpec:
| Article |
Link |
| Install or Configure LoadSpec | |
| LoadSpec Arguments | https://www.blackbaud.com/files/support/guides/infinitydevguide/Subsystems/infutil-developer-help/Content/InfinityUtilities/rfLoadSpecArguments.htm |
Step 13 - Configure Insert GUID Macro
After the installing the SDK, you will receive an InsertGuid macro that you can configure within your Visual Studio development environment. The InsertGuid macro allows you generate and insert a new GUID valuees with a single keystroke or button press. This is an extremely useful macro because you will create a lot of new GUID values when you write your XML specs. more...