Exercise: Configure a KPI Instance
Let’s create a KPI instance from a Fundraising KPI named Total Revenue for a Designation that comes standard with the Infinity-based product Blackbaud CRM.
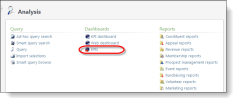
Step 1 - Navigate to the Analysis functional area and select the KPIs task.
Click the KPIs task within the Analysis functional area. This opens the KPI Instances page that is used to create, manage, and schedule updates for KPI instances. Remember that a KPI is the template and the KPI instances are created from the KPI.

Step 2 - Add a new KPI instance.
With the KPI Instances page open, select the Add action above the data list to add a KPI instance. A Select a KPI dialog window appears.
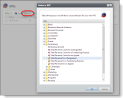
From here, you select a KPI (template) to use as the basis for your new KPI instance. Select Total Raised Towards a Designation Goal in the KPIs\Fundraising folder and click OK.
From here, you select a KPI (template) to use as the basis for your new KPI instance. Select Total Raised Towards a Designation Goal in the Fundraising folder and click OK. The Add a KPI screen appears.
Step 3 - Add parameters for the new KPI instance.
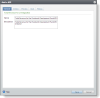
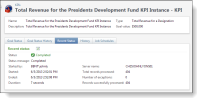
The Add a KPI screen allows you to decorate your KPI instance. On the General tab, enter a name and description for the KPI instance.

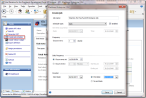
Select the Criteria tab to provide the KPI instance with parameter values such as a designation. In the Designation field, select the President's Development Fund (lookup id = DEVELOPMENT). Don’t worry about the other optional parameters right now.


Select the Preview tab and press the Preview button to preview the value of the KPI on a specific date for the designation.
Step 4 - Add goals to the KPI instance.
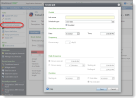
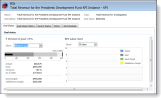
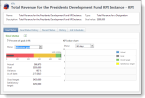
Let’s provide a goal for our KPI instance. Since we raised more than $60,000.00, I think $500,000.00 is a respectable a goal. Use the figure below for the remaining values on the Goal tab.
| Property | Value |
|---|---|
| Goal value | $500,000 |
| Goal aim | High values are good |
| Good target | 450,000 |
| Satisfactory target | 250,000 |
| Milestone 1 | |
| Milestone date | 3/31/2013 (or whatever year makes sense) |
| Milestone goal | 100,000 |
| Good target | 90,000 |
| Satisfactory target | 50,000 |
| Milestone 2 | |
| Milestone date | 6/30/2013 |
| Milestone goal | 250,000 |
| Good target | 225,000 |
| Satisfactory target | 125,000 |
| Milestone 3 | |
| Milestone date | 9/30/2013 |
| Milestone goal | 500,000 |
| Good target | 450,000 |
| Satisfactory target | 250,000 |
When you are done, your Goal tab should look similar to the following:


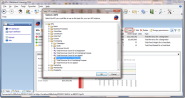
Go ahead and select the History tab. Select the Archive only the last radio button, and leave "10" in the field.
Click Save to save and close the KPI instance. You return to the KPI Instances page.
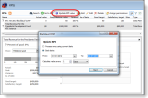
Step 5 - Update the KPI instance value.
Select your new KPI instance in the data list and click the Update KPI value action. The Update KPI dialog window appears.
Slect to back date the values for the KPI from the beginning of the year to a date that makes sense (today’s date).
Click the Start button to update the value of your KPI instance.
After you click Start, you are directed to the KPI instance's page. You will see that a process has started to calculate your KPI instance value. After you create an instance, you can generate the KPI values associated with the instance settings whenever necessary. When you generate values, the selected KPI record opens, displaying details about the indicator values.
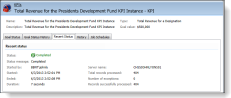
Click the Goal Status tab and review your status given the first milestone.
Step 6 - Establish a job schedule for the KPI instance.
You will need job scheduling configured to complete this step.
Our next step is to configure a job schedule that will periodically start a process that calculates and updates the KPI instance value. You can arrange to generate KPI instance values automatically, even during off-hours, using the Create Job Schedule option available on the KPI Instances page.
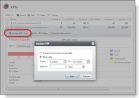
To create a job schedule, click Create job schedule action under Tasks on the left or click the Add action on the Job Schedules tab. The Create job screen appears.
In the Job name field, enter a descriptive name for the scheduled process.
To suspend the scheduled process, clear Enabled. To activate the process, select Enabled. By default, the checkbox is marked.
In the Schedule Type field, select the desired frequency for the process, and then make any necessary changes to the job's frequency and duration.
To save the changes, click Save.