QuickBooks Export Set Up
To take advantage of the QuickBooks Desktop Standard Export, you must first set up your eTapestry database to track the information QuickBooks requires.
eTapestry Funds and the QuickBooks Chart of Accounts
The QuickBooks Desktop Standard Export affects three types of accounts:
- Bank (or Cash)
- Income (or Revenue)
- Accounts Receivable (or Receivable)
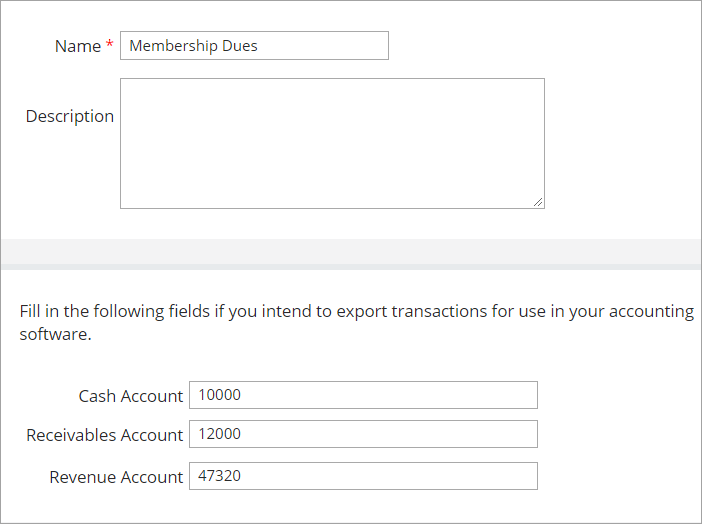
When we set up a Fund in eTapestry, we tie it to a specific Bank, Income and Accounts Receivable account from the QuickBooks Chart of Accounts. The simplest way to do that is to enter the account number that you find on the QuickBooks Chart of Accounts for each of these accounts.
For example, a Fund can be set up to direct donations to the Checking account (account number 10000) as the Cash account, the Pledged Income account (account number 12000) as the Receivables account, and the Membership Dues account(account number 47230) as the Revenue account.
Note: If you use Sales Receipts and select the Cash Sale option, you must set up the Cash Account for each of your Funds to point to the QuickBooks® Undeposited Funds account, either by name or by account number.
Different types of donations are treated differently. eTapestry allows you to direct Gifts, Pledges and Pledge Payments to different QuickBooks accounts.
| Donation Type | Debit Account | Credit Account |
| Gift | Bank/Cash | Income/Revenue |
| Pledge | Accounts Receivable | Income/Revenue |
| Payment | Bank/Cash | Accounts Receivable |
-
A Gift or Recurring Gift involves cash in hand. The export directs a gift to debit the Cash Account and credit the Revenue Account set up on the Fund. In the example above, a Gift will debit the Checking account (since the amount in checking increased as a result of the gift) and will credit the Membership Dues account.
-
A Pledge or Upgraded Pledge involves a promise of future cash. The export directs a pledge to debit the Receivables Account and credit the Revenue Account set up on the Fund. In the example above, a Pledge will debit the Pledged Income account (since the amount of promised money increased as a result of the pledge), and will credit the Membership Dues account.
-
A Pledge Payment involves the fulfillment of a promise. The export directs a pledge payment to debit the Cash Account and credit the Receivables Account that have been set up on the Fund. In the example above, a Pledge Payment will debit the Checking account (since the amount in checking increased) and will credit the Pledged Income account (to reduce the amount of promised income).
A Receivable account is used to keep track of money that you expect to receive in the future; therefore, a Pledge is tracked in a Receivables account. However, you may not want to export pledge information from eTapestry to QuickBooks.
In this case, you will need to set up the Fund to use the same account for the Receivables and Revenue accounts. Then, the export will direct both Gifts and Pledge Payments to the same accounts. If you leave the Receivables account value blank, this will cause the export to ignore all Pledge Payments.
Warning: If your organization decides to start exporting pledges in the future, the export will direct the transaction to debit and credit the same account.
There are a large number of configuration options that you can select from when you set up your QuickBooks installation. One of these options governs whether accounts are referred to by account number or by account name.
If you have not selected to use account numbers, then you must set up the Funds in eTapestry to point to account names.
For accounts like Checking that stand on their own, you can manually enter the account name. However, it must be spelled the same as it is in QuickBooks. If the spelling is incorrect, the import will interpret this as an attempt to add a new account add a Bank account to the Chart of Accounts with a name spelled as it is in the import file.
For accounts like Membership Dues, which are subaccounts, you must include the name of the parent account as well as the subaccount in the field on the Fund page. Use a colon to separate the parent account name from the subaccount name.
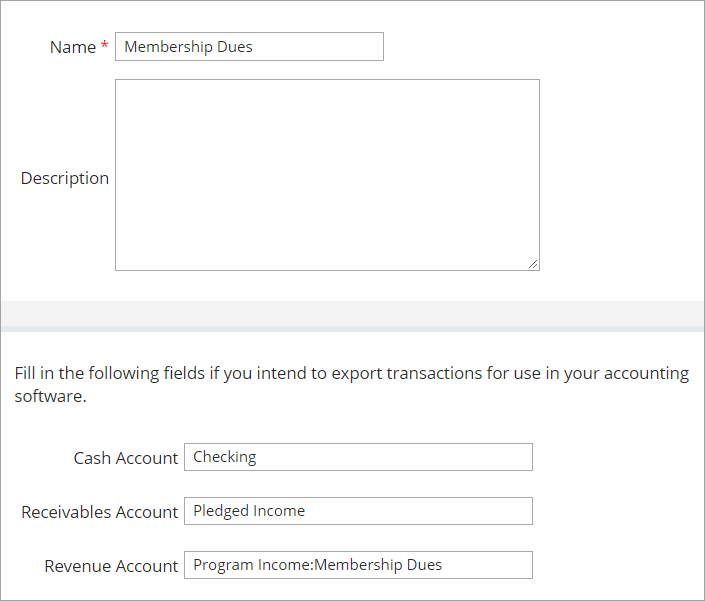
For example, we might set up a Membership Dues Fund in eTapestry that has a Cash account of "Checking", a Revenue account of “Program Income:Membership Dues”, and a Receivables account of “Pledged Income”.
Using Classes in Quickbooks
QuickBooks provides the option of using Class Tracking to classify transactions within or across GL accounts. For example, if you use the standard Non‐Profit Chart of Accounts, it has accounts that separate Corporate Contributions from Individual Contributions.
Your organization might also want to categorize your contributions based on the programs that you support. For example, Africa Relief vs. Asia Relief. You can compare the success of the two programs by running the same standard accounting reports for each class.
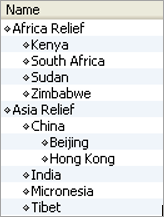
QuickBooks allows users to organize your classes by creating subclasses within classes.
If you elect to use Class Tracking in QuickBooks, you will also want to capture Class information in eTapestry. eTapestry uses three user defined fields to store Class information on atransaction.
These user defined fields are called Class, Subclass 1 and Subclass 2. Using the Class scheme example above, to direct a transaction to the Beijing subclass under the China subclass under Asia Relief, the value for Class would be set to “Asia Relief”, Subclass 1 would be set to “China” and Subclass 2 would be set to “Beijing”.
Your organization will have to set up these user defined fields as they are not part of the standard list of fields. For more information on how to create these user defined fields, see Add a user defined field and User-Defined Fields for QuickBooks Desktop.
Quickbooks Export File Format
After GL accounts on your funds and transactions are ready to export, you can run the QuickBooks desktop export.
Transferring donation information from eTapestry to QuickBooks is a two step process:
- Create an export file from eTapestry.
- Import that file into QuickBooks.
The format of the file created by the QuickBooks Desktop Standard Export is called the Intuit Interchange Format (IIF) and is the only format that QuickBooks can recognize to import transaction information. The IIF file is really a tab‐delimited text file. What makes its format special is the header records and the record code values that are specified by QuickBooks.
This header section tells QuickBooks what information is being provided in which column of the import file. The first line of the header section specifies information to be stored on the Transaction entry in QuickBooks, the second line of the header section specifies information to be stored on the Distribution entry in QuickBooks, and the third line of the header section indicates that it is the end of the header section.
Tracking Donors in Quickbooks
Whenever a donor’s name appears in the NAME field on an import file, that donor will be stored somewhere in QuickBooks. There are three places in QuickBooks where imported donor names can be found:
- Customer list
- Vendor list
- Other Names list
If you choose to track donors as Customers, then you might do some donor-level reporting out of QuickBooks instead of eTapestry.
If your accounting system is set up to track donations as Cash Sales, then each import must associate each donation with the donor as a QuickBooks Customer. The QuickBooks Desktop Standard Export in eTapestry provides the option of exporting donors into QuickBooks as Customers.
You may simply want to track the name of the donor on the donation, but you do not want to use QuickBooks to do any reporting on donors. If you do not specify that the donors are Customers, QuickBooks will either put the donor on the Vendor List or on the Other Names list.
Once a name has been entered into any of these lists, it is a manual task within QuickBooks to move it to another list, like when the import tries to store the donor name on one list that is already found on another list. For example, if the import file instructs QuickBooks to put a donor on the Customer list who is already on the Other Names list, an error message appears.
To fix this, you will need to open the donor’s record on the Other Names list and manually change it to a Customer.
Some versions of QuickBooks will recognize that John Smith is the same person as Smith, John, and will import transactions correctly even if the import file contains the wrong version of the name. In other versions, trying to import a donation for John Smith when Smith, John exists in a QuickBooks list causes the import process to display an error message. In that situation, however, the transaction seems to be imported correctly in spite of the error.
You can export constituent names in the First Name, Last Name format by selecting Name or the Last Name, First Name format by selecting Sort Name on the Customer Information step of the Launch QuickBooks Desktop Export page.
Frequently Asked Questions
The Funds for the returned transactions do not have QuickBooks accounts set up on them.
If the account identifier (account name or account number) that appears in eTapestry does not exactly match one of the account identifiers in QuickBooks, the import will create a new account in QuickBooks with a name that exactly matches the identifier provided by eTapestry. To resolve this problem, you will need to make the account identifiers match.
When you use Account Names to identify QuickBooks accounts in eTapestry, the subaccount name must be preceded by the primary account name in order for the transaction to be placed in the correct subaccount.
The Donor Report in QuickBooks does not display Deposit transactions. To see the donation on the Donor Report, you must import the donation as a sales receipt, using the Transaction Type of "Cash Sale" in the eTapestry export.
A QuickBooks Transaction is a record of a business exchange of goods or money involving a single GL account, like a deposit into a bank account. A Transaction can be made up of several detail items, called Distributions, each of which is also associated with a single GL account (not the same one as the transaction).
If the eTapestry export was not set up to create customer records, then any new donor names that come over in the export will have been put on the Other Names list (or sometimes the Vendor Names List). You can move the new donor from the Other Names list to the Customer list in QuickBooks.
-
Open the Other Names List.
-
Find the donor on the Other Names list and click on the name to open the record.
-
Click the Change Type button on the bottom right side of the page.
-
Select Customer on the Select Name Type dialog box. Click OK.
If you are using Pledge/Payment records in your database, a query that retrieves Pledge Payments will also retrieve the Pledge portion of any identified Pledge/Payment record.
You will need to manually remove the reference to the Pledge from the import file.
If you are using Pledge/Payment records in your database, a query that retrieves Pledges will also retrieve the Payment portion of any identified Pledge/Payment record. You will need to manually remove the reference to the Payment from the import file.